Sunday, December 31, 2017

Twas the Night Before Star Wars

I took a little holiday break to have some fun with this illustration (it was an entry for the "It's Raining Men" contest over at Daz3d.com -- the contest focuses on "the male form," meaning that all renders must have a male figure as the main focus).


In this case, I decided to throw in a little scene of "domestic bliss" with two brothers. I'm pretty happy with the differences in their body types and apparent ages. The younger brother is the Paul figure which ships with Poser, and the older brother is based on the current morphs I've been working with for the Michael 4 figure. As you can see, I kept their names in the caption text. I'm also pretty happy with the expression on Mike.

As usual, the scene was rendered in Poser 11, then cleaned up in Photoshop and final composition was in Manga Studio 5EX (aka Clip Studio Paint).

Hope you enjoy this and have a Happy New Year!

Friday, December 15, 2017

Days Gone 12 - Location, Location, Location, pt 4

Last time I showed you the unretouched render that Poser 11 created. As you could see, the basic shapes were there, but it was nowhere near a finished illustration. It lacked detail, and anything that would really give it a sense of scale. Not to mention the cave near the top where the dragon lived.

So, I then started on a process that surprised me with how long it took to get something solid that I really liked. Oh, I was able to generate a few images that were kind of close to what I wanted, but since this was the first page of the story, I really wanted to make an impression with it. Plus, even though my deadline was rapidly heading toward me (so much so that I was pretty darned sure I was going to miss it), I spent the extra time to figure out what I wanted and how to get it.

Here are a few examples of the early drafts that I was able to create.


1. My first attempt at page 1
Note the dark shadows on the distant mountains
and the tick horizon lines.

This first look (and all subsequent designs) include a hand-drawn trail going up the side of the mountain to a small cave opening. I struggled for a long time as to whether there should be a path leading directly up to the mountain, or off to the side. I finally decided to forego logic (why would anyone in their right mind make a road leading to the home of a fire-breathing dragon?) and just focus on the illustration itself. The composition was simply stronger with this path, so it stayed.


2. This was a very experimental look, with a very
strong tint of gray sand and a less
dramatic sun effect.
My first attempt at darkening the sand was promising, as it made the road really stand out and enhanced the sense of "dramatic scale" that I was striving for. Alas, it was just too dark. And when I showed the illustration to some people at the Daz3D forums, they thought it looked more like a vortex than the sun, so this experiment was very short lived.


3. A later attempt. Note the thinner horizon lines
and the obvious addition of the gray tint to the sand.
This helped make the road "pop" more, but
ultimately I didn't like the effect.

Other experiments included lightening the sand, editing out some of the ground lines, and working to add another layer of shadow the dunes. This one survived for a long time, but I ultimately decided that the ground was still just too dark, so I scapped it and moved on.


4. Getting much closer to the final version.
Note the addition of the mountain's shadow,
and toning down the shadows on the
distant mountains.

The image above (No. 4) is very close to the final piece. I added the ground shadows to the dunes, leaving the barren sands mostly white. And, of course, the mountain's shadow helps deliver the "pop" that the previous "dark sand" versions did. I also simplified the plants in the foreground, and greatly lightened the distant horizon. As I said, a lot of work, but I'm finally mostly happy with it, and that means I was finally able to move onto the interior of the cave.

Next Time: Building a Better Cave


Monday, December 11, 2017

MS Word – Find Text, Replace with Clipboard Contents

Here's a useful tip that can help in a variety of situations.


  • Scenario 1: You want to replace a string of text with a graphic (maybe replace the company's name with a graphic version of it, or want to replace a mathematics formula with a PNG graphic of it so that it will not be changed across mobile devices.
  • Scenario 2: You want to find and replace a string of text that has formatting in it, like a subscript or superscript (H2S = H2S, or 1st = 1st).
Here's a way to quickly do that.
  1. In the word doc (or elsewhere) find the thing you want to copy (graphic, properly formatted text, whatever).
  2. Copy it (CTRL+C, or from the menu).
  3. Use the Find/Replace command in MS Word (CTRL+H)
  4. In the Find What field, enter the string of text you want to find.
  5. In the Replace with field, enter this: ^c (the first character is found by typing SHIFT+6).
  6. Now, whenever you use the find/replace, it will paste the contents of your clipboard.

HOW IT WORKS: This technique replaces whatever you are searching for with whatever you have in the clipboard.

That's it. A very simple solution to an annoying problem.


Friday, December 8, 2017

Days Gone 11 - Location, Location, Location, pt 3

With the landscape props selected (see last week's post), I then set about creating the base image. I set the camera up with the correct page dimensions, yielding me an image with the dimensions of 5,300 x 8,200 pixels. This is for an 800 dpi resolution.

Some of you who do 3D on a regular basis might be freaking out about the size of the image. I can't count the number of times I've had "experts" tell me that anything above 300 dpi is a waste of time. Even some of the more "enlightened experts" think that going above 600 dpi is a waste. But here's the reality, folks: for you to get the most out of Poser and Manga Studio, YOU NEED TO HAVE ENOUGH PIXELS TO WORK WITH. Yeah, I shouted that because it's important.

The Comic Book Preview in Poser works better when it has a lot of pixels to work with. And, because it is only rendering in b&w, even an image of that size will render in less than 3 minutes (often half that time).

A screenshot of my Poser environment for creating
the opening page of my story.
I also find that the pens in Manga Studio (aka Clip Studio Paint) work better with more pixels. There's simply more pixels for it to use when calculating the end tails (the thin part at the end of a stroke) as it goes from thick to thin.

The groundscape was a bit of a challenge, and I do wish I could show you a link to what I chose, but I can't find the original product. I suspect it's something that's been in my Runtime directory for a long time. I didn't find any ground or desert plains that I liked, but I did find patches of snow that I liked. I distorted them to be very flat and then moved them around until I came across something I thought looked like desert dunes...more or less. If I do ever track down the source for the snow, I'll provide it to you.

With the basic shapes in place (using the distorted Cliff Demon for the front, and other ones for the background), I was ready to render and then move it into Manga Studio to start working with it. As you will see, this process produced a lot of variations as I struggled to find a look that I liked and that captured the sense of scale I was trying to convey.

Next Time: A few rough drafts

Friday, December 1, 2017

Days Gone 10 - Location, Location, Location, pt 2

As an artist who uses 3D as the basis of my work, I face a few problems that are more closely related to film making than they are to traditional comic book illustration. That is to say, a comic book artist can pretty much draw whatever he imagines, whereas a filmmaker needs to scout for locations, or build a set on a studio.

In terms of 3D, these two options can be equated to buying a ready-made 3D resource (prop, set or scene) or modeling one from scratch (or paying someone else to create it for you). Modeling anything, even something as relatively simple as a mountain spire, is a time-consuming task, and one that I would rather avoid whenever I can. So, I hit the 3D asset stores and started looking for both the mountain and the cave. The three places I searched hardest were:


The first two of those vendors should be very familiar to anyone who works with either Poser or Daz Studio. The third store is tied to the Unity game development platform. Despite not having content specifically geared for use in Poser, there are a LOT of useful models and assets there that can easily be imported into any 3D program, including Poser.

After a fairly long search, I finally settled on Cliff Demons Landscape Props by Poisen.

Cliff Demons Landscape Props by Poisen
Available from Renderosity.com
The thing that I liked was the general shapes, not so much the faces (although I did consider using them). These were sold as OBJ files with associated textures (which I did not use). Ultimately, I selected one that had the general properties and then stretched it up nice and tall, and turned the face away from the camera.

This is the one I selected. I stretched it very tall
and then turned the face away from the camera.

I also used some of the others, stretched out short and wide, as the distant mountains that you saw in last week's post of my initial rough draft.

Next Time: A few drafts of the first page

Friday, November 24, 2017

Days Gone 9 - Location, Location, Location, pt 1

As I said much earlier, one of the things that appealed to me about this story was the small cast (whom you've "met") and a limited location. In fact, the whole thing takes place inside a single location: A mountaintop cave which happens to be the lair of Clawfire the Wicked.

My very first thumbnails for the story opened inside the cave and all action took place there. But when I started to flesh it out, I instantly realized that I needed an establishing shot to show where the cave was located. So, I drew the rough draft shown below:

Original rough draft sketch for page 1
of Days Gone. © 2017 Mike Mitchell

As you can see, my sketch is very rough. The sketch is 100% of its final printed size, with the various boxes representing the bleed, trim and safe zones for the story. I created the template in Photoshop based on the template provided by my printer, Comix Wellspring. I also pre-printed the intended logo for the story (but that's since changed, and moved to page 2).

The goal of this image is to set the scene for the story, with a fantasy-type mountain as the scene. The switchback path on its front was added to help give it a sense of scale. You'll also see that I originally considered adding a bunch of trees or a village to help set the scale and give it a sense of place in the world.

As you'll see, very little of that survived my first attempts at actually creating the image.

Next Time: Finding the right 3D resrouces

Friday, November 17, 2017

Days Gone 8 - Meet the Cast, pt 3

Calling this next figure a "character" in the story may seem like a bit of a stretch because he doesn't have any dialogue in story. But he's a very powerful presence, nonetheless:

Clawfire the Wicked


I always knew the dragon would be a big part of the story. Heck, without him, there is no story! But finding the right look for him, on a model that would work correctly in Poser, took a little doing. I found several good dragons, but none of them had the classic ridge spines I wanted. They all looked like glorified lizards with wings. In other words, they lacked the epic quality that I wanted for this story.

I finally found a combination of a figure and character that worked for me: The figure is the Daz Original Dragon 3 figure, and the character is the Zilladreki character by RawArt. Both of these products can be purchased at Daz 3D website: www.daz3d.com.

Daz Dragon 3
Provided the base shape
and movement parameters

Zilladreki
The spine ridges are a separate
prop that can be added to the dragon
.

To get the horns and other modifications to the base model, I also needed the Dragon 3 Morphs by Daz Originals. Combined, these gave me the tools I needed to create this powerful creature of myth and magic.


Clawfire the Wicked    |    © 2017 Mike Mitchell
Of course, having the character's look didn't mean that I had a NAME for our fire-breathing friend... er, fiend. For some assistance, I posted a request for naming help on Facebook. I put the request in two groups: The ICC Independent Comics Creators (a great place to hang out with other creative folk) and a group devoted to old-school gaming (RPGs and minis, mostly). Between those two groups, I got more than 500 suggestions. The funny thing is, I chose two and mixed them together to come up with the name, and they were submitted in the first 10 names I got!

Thanks to David and Ronan Houston (a father and son team) for creating the name of our wicked dragon who will drive the action of this story.

Next Time: More about the Location of our Tale

Friday, November 10, 2017

Days Gone 7 - Meet the Cast, pt 2

The second character in my little tale doesn't really have a name. I sometimes call him Bobby Lee, but that's mainly because he's based on the Bobby Lee character I created for this illustration in another story.

One of the illustrations I created for Roger Keel's story,
"The Children Game"  © 2017 Mike Mitchell

Another look at Bobby (M4 character, rendered in the usual way)
© 2017 Mike Mitchell

After I created the Bobby Lee Character for the Michael 4 figure, I decided to modify it a bit and re-purpose it for use in my Days Gone story. Even though keeping his husky body type caused problems, I wanted to differentiate him from all of the other muscle-bound barbarian characters out there and provide a little diversity to his body shape. I also didn't want him to look like another Michael 4 clone in a comic (if you know 3D figures, you can easily play "Spot the Michael Version" and identify ver 3 from 4 at a glance).

Alas, this diversity also created some problems. My initial costume design included the figure with a simple baldric draped over his shoulder. Even though this should have been simple, it wasn't. I just couldn't get it to hang perfectly from each direction. I briefly considered converting it into a dynamic prop, but adding animation to the workflow was bound to increase the amount of work and time needed to get this story finished.

Bobby Lee sported a whole new look for this story, including
modifications to his face design and tweaks to his weight and abs.
© 2017 Mike Mitchell


So, I went shopping for a new chest harness. After considerable hunting, I found this beauty, which includes lots of useful fit morphs: Prae Epoch for M4

Product image from Renderosity.
© 2017 Prae

Obviously, I wasn't interested in the funky mask or the skirt, but the chest harness had just the right amount of detail needed to give Bobby a little of that barbarian look that I was going for. And this thing was LOADED with fitting and shape morphs. Seriously, this is one of the best products I've encountered in ages.

Hero Leaps: This illustration features the updated leather chest harness
© 2017 Mike Mitchell

As you can see in the image above, this is a pretty cool product and definitely adds a hint of "Swashbuckler" to the character.

NEXT TIME: A fiery "co-star"

Friday, November 3, 2017

Days Gone 6 - Meet the Cast, pt 1

One of the reasons I'm tackling this story first is that it has all the elements needed to make it a sort of testing ground for my ability to use Poser and Manga Studio (Clip Studio Paint) in my workflow to create a comic story. Here's a few of the things that make this story an excellent test case (I mentioned this in an early blog: short story of 12 pages, 3 characters, 2 sets).

If you followed my tutorial on creating noir comics, you should already be familiar with one of the characters from my story: Nirona the fairy.

Nirona
© 2017 Mike Mitchell
She's a fun-n-flirty young lady prone to exaggerated movements and broad expressions. She is a LOT of fun to illustrate. Here are a few other shots of her for your consideration.

Nirona - Flirty
© 2017 Mike Mitchell

Nirona - Angry
© 2017 Mike Mitchell
These have both appeared previously in the tutorial; they were created as character studies with an emphasis on personality and emotion.

Here's an actual panel from the story.

Nirona - Put a Ring on It!
© 2017 Mike Mitchell
This included a ring that I created in Poser using a variety of primitive shapes on which to mount a gemstone that came from some package I had purchased previously.

NEXT TIME: Our Hero Makes an appearance

Tuesday, October 31, 2017

Happy Halloween - Afterlife with Archie

Happy Halloween!


It's time for witches to fly and the dead to rise!
Let the wind blow, let the mad seethe, 
The time has come for the dead to breathe!

It's HALLOWEEN, folks! Time to get your scare on! Especially if you're from Riverdale and wander into my front yard and drink in this scene of terror!

Yeah, that's all-American boy Archie Andrews battling
his former best-pal Jughead Jones.

And yes, these are life-size figures in my
front yard, illuminated by black light.

Machete-in-hand, Archie will avenge the fallen members of his gang.

Hot Dog is just looking for a bone to gnaw...

Even the rotten shall fall to Juggie's inhuman hunger!
I guess there's just no accounting for taste!


Most of the scene is illuminated by some SERIOUS black light (I'm not kidding, my last year I needed 7 black lights to light up this scene, but my new 36W black light spotlight is so powerful that it handles almost all of the power. I am using it and only one small 10W bulb as a fill-light for Archie's britches.

There are also night lights inside the masks. And a small misting of orange florescent paint on Archie's mask and hands to make them illuminate in the UV lighting. Until I added that (and the three night lights in Archie's head), he wasn't showing up at night (and since tick-or-treat is after dark, that's very important.

Friday, October 20, 2017

Making Comics: A few Resources

Recently, someone at the Daz3D.com forums posted some character designs and said he wanted to use Daz Studio to create a graphic novel in the next year. I critiqued his illustrations (decent character designs, but the lighting was a bit off, I thought).

I also posted the following response, which I thought I'd share here with you guys.

As someone who is also working on some comics projects, if I may make one suggestion, it be to read some books about drawing comics (specifically laying them out and lettering them). You see, that's where most of the people who use 3D to make comics come up short. They produce beautiful single images, but they don't flow like a comic should. Of course, this is just my opinion.
 Here are some resources I would suggest:
  • How to Draw Comics the "Marvel" Way by Stan Lee and John Buscema
    This is an oldie, but a goodie. It can completely revolutionize the way you look at framing, laying out your panels, and telling a story. Available at Amazon from $10 up.
  • Drawing Crime Noir: For Comics and Graphic Novels by Christopher Hart
    Even if you're not drawing a crime noir comic, this is a GREAT resource for moody lighting and creating interesting characters that "pop." At Amazon for about $11.
  • Making Comics: Storytelling Secrets of Comics, Manga and Graphic Novels by Scott McCloud
    This is a heftier read, and not quite the down-n-dirty basics of the other two books, but it really gives you a high-level understanding of what should go into a good comic story and then drills down to specifics. Amazon: About $20.
There are NUMEROUS other books I could recommend, but these are the three I would start with, and I have listed them in order of importance to anyone creating a comic for the first time.

In regards to lettering, I highly recommend this free, online series by pro letterer Nate Piekos, who also runs the Blambot Foundry (and, by the way, he has some great FREE fonts at his site, too). His lettering tips can be found here: http://blambot.com/articles_tips.shtml

Wednesday, October 18, 2017

Days Gone 5 - Documenting My Workspace

Just a short post this time, I'm afraid. As I've said, this is the first time I'm using the multi-page story feature that is available in the "EX" edition of Manga Studio / Clip Studio Paint. In the past, I made each page separately and just combined them manually later in InDesign or QuarkXPress.

This time, however, I wanted to keep all the settings consistent from one page to the next, and as such, I've done two things that are new for my comics work:

  • I created a binder to store all the materials in one place (typically, I used file folders)
  • I made screenshots of my settings and put them into the binder.

I documented my settings with a few screenshots
of the applicable menus, and some notes.
I whipped this up in Photoshop in about 10 min.
As you can see, there's not a lot of detail here, but just enough so I can document what I did at each step of the production cycle. If I can get ahead at all, I plan to document all the props and parameter settings used for the major characters in the story. But, since I'm already falling behind, I think that's unlikely for this project.

Here's a shot of the binder.

My project binder for the Days Gone story.

As you can see, I've tipped in the sheet with the project settings (this is configured for printing at Comix Wellspring; the same company that quickly printed my comic, Fanzine Flashback: Ultra #1).

This is, of course, the sort of thing I do with my professional technical writing projects. Organization is essential to finding what you need when you need it. I'm hoping the small amount of time I've spent on project management will pay off in the end.

NEXT TIME: Ummm... not sure. Maybe some updated character designs? Or something else.

Friday, October 13, 2017

Days Gone 4 - A Short Complaint About Manga Studio (Clip Studio Paint)

This short story is the first long project I've created in Manga Studio 5 (aka Clip Studio Paint). I've got t admit, I'm finding the new story features to be a bit frustrating. Things that should be easy are actually quite difficult.

For example, I have a layout where I want three equal-sized panels at the bottom of the page with a standard border gutter between them. There's not a single layout in the Frame Materials that has this (in fact, I think someone could clean-up if they made a really GOOD package of frames with lots of options -- but considering how hard it is to bulk load materials, that wouldn't be a good product unless it came with an installer).

Now, MS/CSP does have a split panel option that you can use. And it does the job. You draw one panel and it will split it into three. BUT... and this is a BIG but... it doesn't automatically add the gutters. And there is no way to automatically distribute the three panels horizontally (like you can in InDesign and even PowerPoint). It's little shortcomings like this (and the ability to enter numeric values for the size of the vector frames) that makes this feel more like an advanced hobbyist software rather than a professional-grade tool.

Now, I know a lot of this could just be that I'm not really that familiar with digging deeper into the interface to find the tools I need (and while searching, I did find some really cool new features in the Rulers section, that I will definitely be using soon). But, that's not all of it. I have been a graphics professional for decades and I know the types of tools and features to expect in modern, pro-level software. So far, although Manga Studio / Clip Studio Paint has a LOT to offer, it has a lot of shortcomings.

NEXT TIME: Documenting My Working Environment

Wednesday, October 11, 2017

Days Gone 3 - Changing My Workflow

I've made a few comics in the past, mostly by hand and in a loose, cartoonish style (when I drew it myself), and I had a definite approach and workflow. I thought I'd mention that, for the DAYS GONE story, I'm doing it a bit differently this time.

Normally (in my do-it-by-hand days), I would go through and make rough thumbnails of my pages, then go back and do the following, in order for each page, one at a time:

  1. Draw panel borders
  2. Pencil figures & backgrounds (very light backgrounds)
  3. Add lettering (to make sure it fits)
  4. Adjust pencils if I need more room or the lettering doesn't fit right)
  5. Then ink each panel, one-by-one, until the page is finished.
  6. Then go on to the next page.


But this time, for my all-digital comic, I'm starting off with figures rendered in Poser 11, and they arrive with an "inked line" already on them, including a lot of the shadows and final details present. The difference is, those inked lines are set as material properties (that is to say, I use the Materials Room in Poser to define a thicker Geometric Edge line to clothing than skin (as an example)). This means that if I want to keep the thickness of the inked lines consistent from one panel to the next, I need to render each panel at the size it will be printed (otherwise, if I had to resize the artwork with the transform tool, Nirona the fairy could have thick lines in one panel and thin in the next).

To achieve consistency, I'm actually going through the entire story and setting up my panel layouts and initial lettering FIRST. Now, keep in mind that I've already hand-drawn tight thumbnails, so I have a solid idea of what goes in each panel, and its size relative to the panel borders. In other words, I have a pretty solid idea of what goes where and how big it should be in each panel. If not for laying down the pre-work, I think I would be at a loss for how to approach this.

As I write this ( a few days before this is scheduled to appear in the blog), I'm about half finished laying out the entire book. Hopefully, when this does appear on Wednesday, I'll have this step finished and can move on to fixing the problems I've encountered with my male character's costume – more on that soon.

A sample of pages 6 & 7 from the story.
This page is 50% of the final output: I'm working at 800 dpi.
© 2017 Mike Mitchell

Above is a sample of the panels laid out. As you can see, I've even added some of the background and imported the one panel that's completely finished (I might need to reapply the line tones in that panel, as I think it uses a different line frequency than I chose for the entire story). Also, the "rough border" is going to get some more love soon. I want it a lot more jagged and splattery in the final version, but everything here is a quick "rough," so I drew it and now it's time to move on to the next page. AND, the black panel borders on that first page will be completely cut off -- they are in the trim zone for the page.

NEXT TIME: Documenting My Work Settings

Friday, October 6, 2017

Manga Studio (aka Clip Paint Studio): How to Save Custom Panel Layouts

I'm working on the Days Gone comic story, and am doing my first multi-page file in Manga Studio 5 EX (this is one of the few differences between the PRO version and the EX version: the ability to have multiple pages in the same file). The advantage to this is that it will maintain consistency between the tone frequency and panel border thickness -- all useful things in a story (as opposed to doing it manually page-by-page).

I have two layouts that repeat on two pages: two panels at the top and one big panel at the bottom. And this looks like a layout I might want to use in the future, so I went to YouTube to find a tutorial on it -- and found a great one.


The video is about 10 minutes long, and WORTH WATCHING in its entirety. However, if you just want to know how to save a design as a custom layout (i.e. material), then jump to the 9 min mark.

NEXT TIME: Character Designs (and maybe some stuff on dynamic clothing)
Update Oct. 08, 2017: Turns out, next time we're talking about workflow issues. I'll get back to character design shortly.

Wednesday, October 4, 2017

Days Gone 2 - Starting a "New" Comics Project, Part Two

As you may recall from last time, earlier in 2017 I was cleaning up some scans for some mini-comic I had published back in 1989 and 1990. While doing so, I got the bug to write a new story. Now, sometimes when I write, I do it as a script. Other times, I actually sketch out rough thumbnails of the layout, and include the dialogue and captions.

This time, I did the latter: I grabbed some paper, a ballpoint pen and whipped the whole thing up in short order.

My thumbnails tend to be very rough and very fast...
even moreso when I'm drinking Irish Whiskey.

As I explained last time, I sipped a little Irish Whiskey and, over the course of two evenings, whipped up an 8-page script with breakdowns for a new fantasy story that would roughly fit into my "Days Gone" series.

And then the pages sat in my drawer until, sometime later, I decided that I wanted to complete this and add it to the FANZINE FLASHBACK comic I was planning (see last week for details). But this time I didn't want to do it with my old cartoon style. I wanted to do it with my 3D workflow using my current noir style (or something close to it). Part of my motivation is that I really want to quit dabbling with single illustrations and random comic pages, and actually finish a complete story this year.

And Days Gone #3 is a perfect candidate for that, for the following reasons:

  • It's short (8 pages, but I think it will grow to 10)
  • Small number of characters (hero, faerie and dragon)
  • Two scenes/sets (mountain landscape external, dragon's cave internal)
  • Reasonable but solid deadline (mid November 2017)

The deadline, btw, stems from the fact that I will be publishing this in the Collectors' Club Newsletter

So, that's where we are. I'm starting a new project. I've already designed the two main figures (yeah, the faerie from my Noir Style Tutorial is designed to go in this story), leaving me only the dragon and the sets (which I have already started on).

Stay tuned -- I'll keep you posted on how it's progressing.

Friday, September 29, 2017

Days Gone 1 - Starting a "New" Comics Project, Part One

Whew! When I started my Noir Style Tutorial back in July, I had no idea just how long it would be. I'm pleased with it, don't get me wrong, very pleased that I actually took the time to document everything with an appropriate amount of detail. But that was writing, and I've really been getting the itch to actually make some comics, not write about making them.

So, I'm finally ready to sit down and practice what I preach, so to speak. It's time to start work on my next comic book story, using the style (or a variation of it) that I wrote about in the tutorial.

It's time to start work on: Days Gone #3

At this point, it would be fair for you to ask, "Where the heck are Days Gone #s 1 & 2?" And for that matter, "What the heck is 'Days Gone,' anyway?"

Fair questions.

Days Gone is my overall working title for a group of loosely connected stories about a guy (or guys) who get sucked into a fantasy world of myth and magic. Yeah, it's all Tor, John Carter, Almuric, and (heck) even Amethyst of Gem World, plus about a million other stories. So what? I'm not shooting for originality here; I've got stories and I want to tell them.

As for Days Gone #1 and #2, those are mini-comics that I published back in 1989 and 1990. Naturally, I drew these by hand and photocopied them for distribution. A mini-comic is made by taking a single sheet of copy paper, folding it twice, cutting it along the top, and then stapling the spine. This makes a small, 8-page comic.

Here's a few photos of how you make one.


Take a sheet of paper, fold it twice.

Mark it with the appropriate page numbers. Note how some
of them are upside down, and the pages are out of order.

When you fold it into book shape, the pages will fall into place.
When this is done, you staple on the spine and cut across the top.
This gives you an 8-page mini-comic.

These were some of the last comics I published, and even then I only distributed a handful of copies. Flash forward to March of this year, and I decided to scan these old comics and repackage them as part of my FANZINE FLASHBACK series. By "repackage," I mean reformat them into standard comic book pages. Which basically meant turning an 8-page mini-comic into a 4-page standard-size comic.

While I was working on cleaning those scans (I don't think I mentioned that the originals had been submerged in flood waters for about 8 hours in 2001 during Tropical Storm Allison – that certainly didn't make it any easier), I got the bug to write a new story. So, this past April (April 14-18, 2017, to be exact), I sipped a little Irish Whiskey over two evenings and whipped up a new 8-page "Days Gone" story.

Ad we'll talk more about this NEXT TIME.

Wednesday, September 27, 2017

Media, Netflix, CBS All Access and the Future of Broadcast Television

I've never done this before, but I'm actually going to reprint a discussion clipped from Facebook. For background, last week Star Trek: Discovery debuted on CBS All Access, a streaming service created by CBS to host their content. The unfortunately acronymed show, ST:D, is the first major series by one of The Big Four networks to be created exclusively to promote their new online streaming service.

Needless to say, a lot of people were pissed about this. After all, no one wants to pay $8 a month to watch on new Star Trek series.

So, I was bitching about it online with the mob, and this discussion happened, which I thought might be of interest to some of you.


Mike Mitchell: Right now, CBS sees that cable and traditional Network television are dying. This is a very desperate attempt to latch on to the streaming dollars out there. What they don't realize is that this is doomed to failure because their service offerings are too narrow. Unless they ripped open their entire back catalog of every CBS series that exists, and pulled them off of other streaming services, people are not going to pay for this. And even if they did do what I just said, they still probably wouldn't pay this much. $1 or $2 a month? Possibly. A buck an episode for this one new Star Trek series on iTunes? Probably. But eight bucks a month for a service that has almost no content that interests me? They really are delusional on this one.

Shawn: Ultimately in 10-15 years while there still probably will be some broadcast stations those that haven't gone under will be on life support questioning when advertising dollars will fall so low as to not justify staying open.

Launching a successful streaming service is the future. They could license their content to others, but the middleman will cut into their profits.

Mike Mitchell: Hey, Shawn, I hope you forgive me for the long post. I agree with you in principle, and you may very well be right. But looking at how broadcast has transitioned in the past, I tend to think you're wrong about there only being some broadcast stations "on life support" in the future. My model for this is drawn from the transition that radio (which was dominant from the 1930s thru the early 1950s) made when television supplanted it as the primary medium for entertainment in this country in the latter part of the 1950s. Specifically, radio had sitcoms, dramas, sports and variety shows that literally walked from radio to TV (Jack Benny, Gunsmoke, Perry Mason, and too many others to name). In fact, a lot of radio shows thrived up into the 1960s. When sitcoms, dramas and soap operas left radio, those were dire times for the industry.

But then along came FM radio in the 1960s, and the modern (and still thriving) music stations were born to take advantage of the high-quality sound. At that time, everyone predicted that AM would wither and die... but it didn't. Along came Talk Radio (which isn't just right-wing politics, but includes Do-It-Yourself shows, car shows, technology discussions, financial planning, and doctor call-in shows). Suddenly, AM could (and does) make a LOT of money.

So, I think you are right in one regard: The Broadcast Station AS WE KNOW IT will probably be gone in 10-15 years. But something else will fill that void. Maybe more sports? More Public Access style programming? Probably more crappy Reality TV and TV Judges (unfortunately). It may even bring back the return of the low-cost game show.

Here's why I think CBS All Access (and most other single-source content providers) will fail to launch successful streaming services. PRICE. Most people are "cutting cable" because of the cost. Yeah, a lot say it's that there's lots of content that they don't want to see (my buddy in Seattle has no idea what channels Nickelodeon, Disney or Cartoon Network are on; I have no idea where ESPN is or when football is on a network) and are bitter about being forced to pay for it.

Now, paying $9.50 a month for Netflix is a good deal. I get American shows, Star Trek, British crime/cop shows, and a decent selection of movies and old comedies. My wife and I also like some of their original content.

Looking forward to the show, but not the cost of adding
CBS All Access to my monthly expenses
I just glanced at the CBS Prime time Line-up. The only shows I watch are: Big Bang Theory, NCIS, and NCIS: LA. Three shows. If you add Star Trek: Discovery, that makes 4. There is NO WAY I can afford to pay $8 a month to watch only four shows. And if ABC does it, too? $8 a month just to watch Inhumans, Modern Family and Agents of SHIELD? Ummmm. No. Now throw in $8 for the PBS Channel through Amazon Prime (my wife likes old BBC shows and Masterpiece). Oh, and NBC (for another $8)? All I watch there is The Good Place and Superstore. So, if each "network" comes up with its own streaming channel, we're suddenly up to $32-$56 month? Toss in Netflix or Hulu? I could easily wind up paying $70 for ala cart channels that don't get what I get now. This is why I think they are going to price themselves out of the market. People who are already cutting cable due to its cost are NOT going to pay similar costs for less content.

Finally (and wow, I've been going on a long time), I can't help but remember that Comcast (where I live) owns the cable that most people use to get Internet. All they need to do is start charging more for bandwidth and suddenly cable TV might start looking more affordable.

Thanks for bearing with me. I don't know why I got on such a roll tonight. I guess this is just stuff I've been thinking about. In the end, I think you're right that Broadcast TV as we know it probably only has 10-15 years left. But I do think they will be there – I just don't know what type of programming they will have, or what their primary role/status will be in the evolving media marketplace.

Friday, September 22, 2017

Noir Style Tutorial, Pt. 21 - Contents (Launch Page)

© 2016 Mike Mitchell
The funny thing about blogs is that, typically, search engines list posts in reverse order. If you're looking for the latest post, that's great. But it's not-so-great when you want a single Table of Contents or an easy, chronological listing of a series.

So, here it is. A sort of "Table of Contents" for my Noir Style Tutorial, presented at the end of the series for easy access and indexing. But first, a definition:

The French word for black is noir. Over time, noir has come to reflect a mood, a tone, and most appropriately, a style. Suggestive of danger or violence, film noir is characterized by low-key lighting in a bleak urban setting with corrupt, cynical characters. In my approach, the word noir simply celebrates the color black; it is not confined to a specific genre.
– Shawn Martinbrough, How to Draw Noir Comics


This tutorial covers how to do the following:

  • Configure Poser 11 to render line art from 3D models.
  • Generate at least three renders: black, gray and outlines-only.
  • Clean up the renders in Photoshop.
  • Compositing the layers in Manga Studio (Clip Studio Paint).
  • Different "finishing" techniques: gray scale, halftones and sketch-style.
  • Saving your final images for print or web.

Contents

Noir Style Tutorial, Pt. 1 - Introduction
Noir Style Tutorial, Pt. 2 - Tools of the Trade
Noir Style Tutorial, Pt. 3 - Figure & Limitations
Noir Style Tutorial, Pt. 4 - Inspiration
Noir Style Tutorial, Pt. 5 - Process At a Glance
Noir Style Tutorial, Pt. 6 - Step 1: Figure Set-Up
Noir Style Tutorial, Pt. 7 - Step 2: Turn on Live Comic Book Preview
Noir Style Tutorial, Pt. 8 - Step 3: Edit Materials
Noir Style Tutorial, Pt. 9 - Step 4: Set up Lights
Noir Style Tutorial, Pt. 10 - Step 5: Adjust Lighting
Noir Style Tutorial, Pt. 11 - Step 6: Render Settings
Noir Style Tutorial, Pt. 12 - Step 7: Creating Render Passes
Noir Style Tutorial, Pt. 13 - Step 8: Cleaning up Renders
Noir Style Tutorial, Pt. 14 - Step 9: Image Clean-Up / Hand-Work / Post Work
Noir Style Tutorial, Pt. 15 - Step 10: Quick-n-Easy Contour Line
Noir Style Tutorial, Pt. 16 - Step 11: Applying a Tone Layer
Noir Style Tutorial, Pt. 17 - Step 12: Applying a Color Wash
Noir Style Tutorial, Pt. 18 - Step 13: BONUS: Applying a Quick Sketch Effect
Noir Style Tutorial, Pt. 19 - Step 14: Saving Your Final Image
Noir Style Tutorial, Pt. 20 - Process "Quick" Summary
Noir Style Tutorial, Pt. 21 - Contents (Launch Page)


© 2017 by Mike Mitchell

Thanks for reading. Please post a comment to let me know if you enjoyed this series (and if not, what I can do to improve it).

Wednesday, September 20, 2017

Noir Style Tutorial, Pt. 20 - Process "Quick" Summary

When I started on this Noir Style Tutorial, I honestly had no idea that it would be this long. Both in terms of content, and in terms of how many posts there would be. This is part 20, for goodness sake, and this will have run (twice a week, no less) from July through almost the end of September. There were a few times, I admit, that I struggled with whether or not I was going into too much detail. But, truth be told, if I'm going to sit down and document all of this, I'd rather be thorough so that newbies can understand what I'm talking about.

Nevertheless, I do recognize that experts are going to be put off (if not downright angry) that this is so long. So, I'm going to summarize the entire process again, but this time very quickly and with minimal screenshots. I'm also going link each example back to the main article so you can easily find your way to more detail, should you need it.


Our Goal / Summary
  • Our goal is to create a static, black and white image that looks like it was hand draw using a stark, "Film Noir" (or "Crime Noir") look.
  • We are going to create at least 2 renders in Poser 11:
    • Render 1 will have small, tight shadows. I call this the "black" render."
    • Render 2 has larger shadows. I call this the "gray" render."
  • We will clean the renders in Photoshop (this step is optional – I have actually removed it from my workflow because I have gotten better at using Clip Studio Paint).
  • Final editing in Clip Studio Paint (aka Manga Studio):
    • Create a new document in Clip Studio Paint. 
    • In the Layers Panel, put Render 2 on top of Render 1.
    • Set the blending mode for Render 2 to "Multiply."
    • Set the opacity of Render 2 to 30%.
    • Add frames, words, edit the base renders, etc. to complete the image.

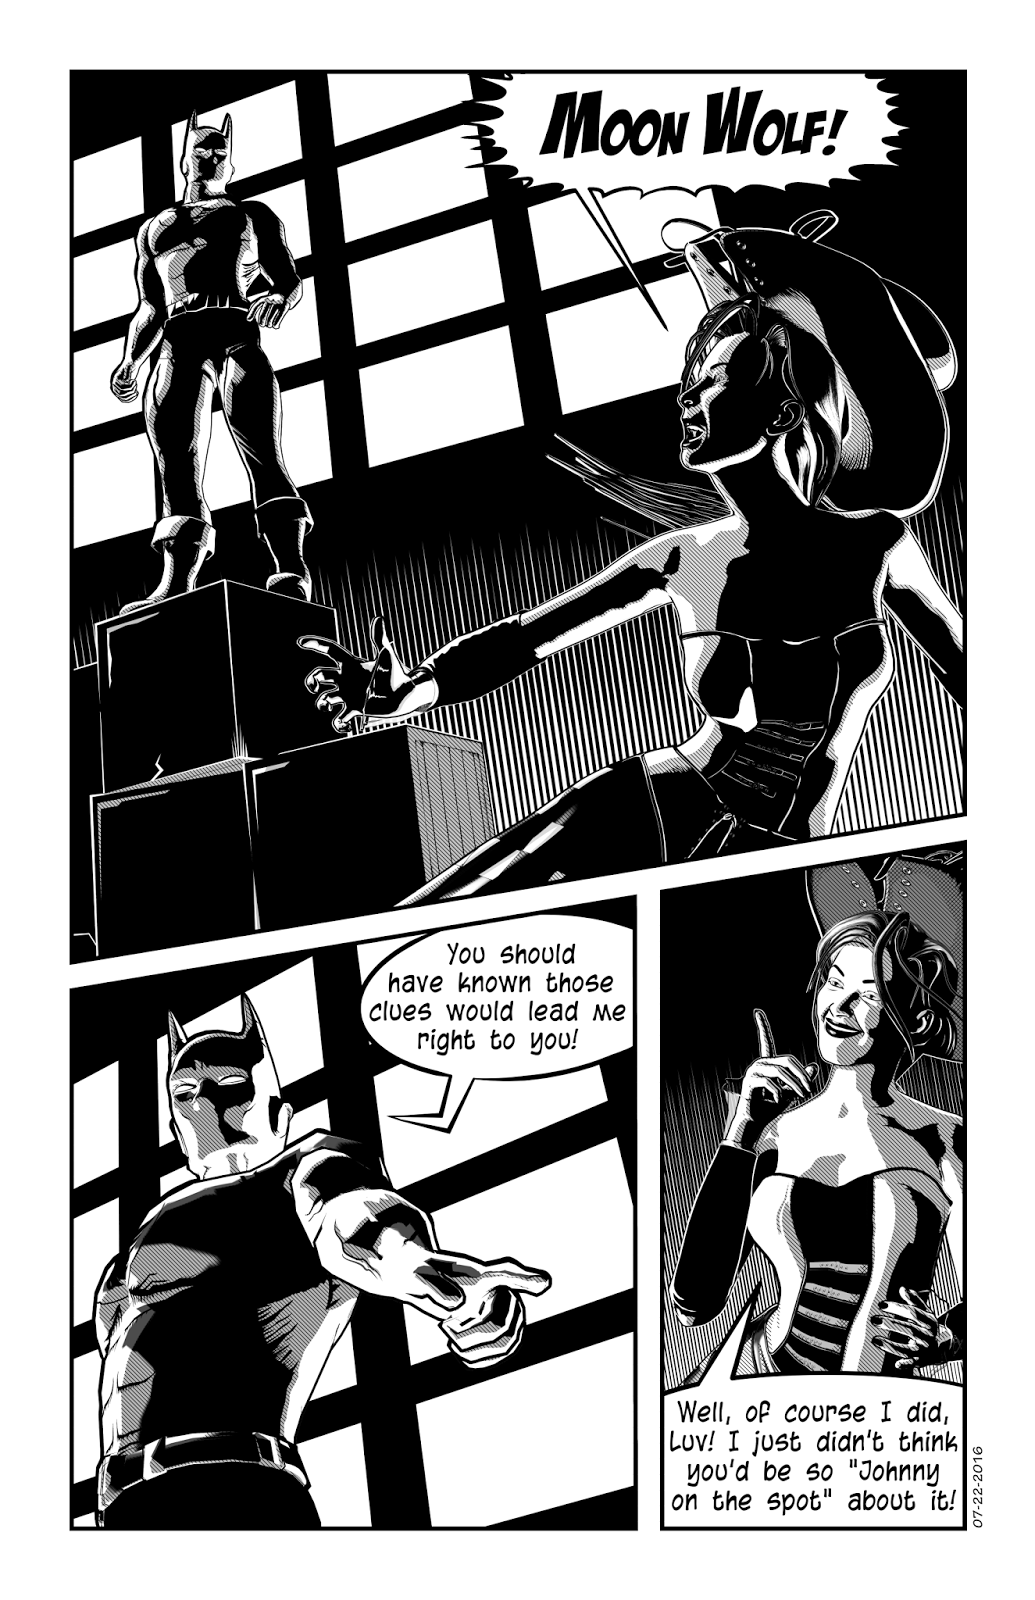
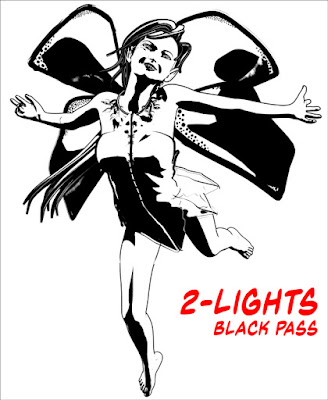
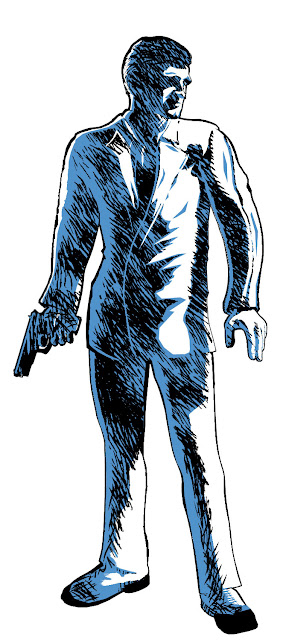
Stark lines, deep shadows and dramatic angles
are all part of the Noir look. This page was
created using the Anomaly Process.
© 2016 Mike Mitchell

The Anomaly Process, Step-by-Step

Step 1: Figure Set-Up
This process only works with Poser 11 (Pro or regular versions), so you need to limit yourself to a figure that works well in Poser 11. I suggest Michael 4 and Victoria 4 as your starting point. We start by opening Poser 11 and setting up our figure, props, etc.

Step 2: Turn on Live Comic Book Preview
One of the cool things about this process is that it is LIVE. You see your results before you render. This makes it very easy to make subtle changes to your render. The icon to turn on the Comic Book Preview is at the bottom of the main viewport. Note that this works with all the display modes: you'll probably want Shaded Textured (or possibly Comic Book).


Click the icon to open the Comic Book Preview Options pane.

Regarding the settings in the Comic Book Preview: Please note that the default settings in Poser are horrible. You need to change these or you will not get good results. I suggest setting the Geometric Edge Lines between 0.25 - 0.66. The smaller the number, the thinner the line that will appear around the edges of the shapes. Likewise, I find that the Threshold settings work best between 0.33 - 0.8 (I typically keep mine around 0.4 to 0.6). The smaller the number, the smaller she shadows. As for the color, that's up to you; I prefer to work in black and white.


Step 3: Edit Materials
For most figures, bump maps are not your friends. They cause little ripples on the skin that look weird. I usually strip my figure of all color and make the eyelashes transparent. Note that, in the Material Room, you can assign a different weight and color to each materials group. This means that clothes can be thicker than skin, etc.

Step 4: Set up Lights
Delete most of your lights so that you have only two in the scene. For each light, you will need to increase the Shadow Preview Map Size. I recommend going as large as your video card can handle (I usually go with 4096, but never go below 1024).
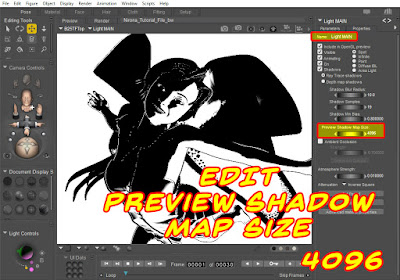
Preview Shadow Map Size tops out at 4096.
Notice that this got significantly darker.
If you only read two full articles in this series, I strongly suggest you read this and the next one. Even if you're very familiar with shadow maps, you can still learn some stuff from this article.

Step 5: Adjust Lighting
I usually work with just two lights: A key light, which is placed to the left and slightly behind/above the figure so that it illuminates the head/shoulders area and makes the figure pop out from the background. And a main light, to illuminate the figure from the other direction. There are different types of lights (Spot, Point, Infinite, etc. Experiment with them to get the results you want.

Step 6: Render Settings
We are using the PREVIEW renderer, so you will need to adjust your Preview Resolution. Render Settings are available from Render option in the Menu Bar (or press CTRL+Y). You'll see the panel, and then you can make the following modifications:

See main article for Step-by-Step guidance.


This setting drives how much detail is allotted to your textures. The bigger the number, the more detail (and potentially longer render times). Remember, if you're working in b&w, the hit to your processor will be minimal. While creating each of the images in the animated GIF below, I didn't even notice a difference between 128k and 8MB.

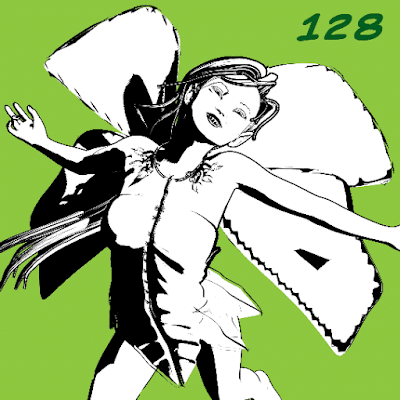
Detail is in the eye of the beholder. You can see that the texture
resolution "tops off" around the 4,096 mark.
The shadows and lines around the top of her dress seem to remain consistent, no matter what settings I use. But the detail on the wings (the only texture map in this scene) definitely look sharper at larger sizes. The shadows on the dress don't change because the dress does not have a texture map. Although you will see subtle changes in shadow placement and clarity on all objects, the most dramatic changes will be on objects with texture maps applied. Personally, I seldom see a "return on investment" by going above 4096, but you should experiment to see what works best for you.


Step 7: Creating Render Passes
The final image will be made up of two or three separate renders.

  • Outlines: No other shadows or details. You can get this by setting one of the lights to IBL.
  • Black: You want a tight group of shadows that define key facial and body features.
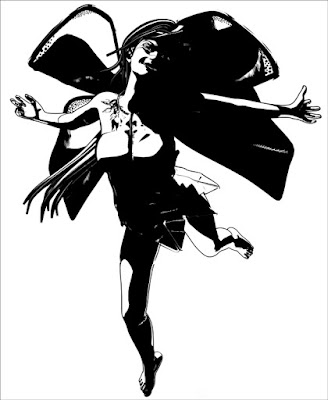
  • Gray: A wider range of black shadows (when we put this in MS or Photoshop, we'll set this layer to 30% - 50% opacity).

Since my finished art includes a solid black area and a secondary gray area, I usually start with the black render: It's usually got small, tightly defined areas of shadow, and I pay special attention to casting light on the jawline because it gives the figure shape.


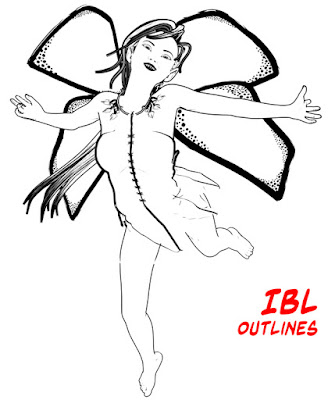
Once I settle the pose, I almost always make a render
using an IBL light because it generates clean outlines.

A strong light from the upper left, just behind the head
helps create a nice contrast under the neck, which
gives the jaw definition. 
Get a bigger spread of black for what will be,
in the end, the Gray layer.


Step 8: Cleaning up Renders
Put the various renders into a single Photoshop file (one per layer) and then use the Threshold Adjustment to remove any gradients or soft shadows.  You may also want to fill any gaps or trim off any excess lines that might exist. Pay special attention to hands and hair, as they tend to get a lot of random artifacts. Also, watch for places where the geometric edge line breaks up (strong curves can be a problem). Save file as a PSD (preserve layers).


Step 9: Image Clean-Up / Hand-Work / Post Work
You can open the PSD file directly in Manga Studio, or you can import each image separately and build your own layer structure. Either way, once you have the renders in MS, clean them up, add detail, and so forth. Pay attention to the teeth, eyes, and hair tips. Also look for any places that you want really sharp points. NOTE: For reasons that will be apparent in future steps, you should make the majority of your clean-up efforts directly on the image layers themselves. For areas that I know I want to be stark white or pure black, I make those edits on a new "touch-up" layer that I keep at the top of the stack.

Step 10: Quick-n-Easy Contour Line
By default, the geometric edge lines are fairly consistent in width. A contour line (often called a cross contour line) is a line that gives extra dimension to a figure by going from thin-to-thick-to-thin again (or the inverse). If you have kept your figure isolated from the background, you can add a quick contour line to your figure with just a few steps. 1. Ctrl+Click the layer with the figure (add/subtract the selection if needed); this will select only the figure. 2. Create a new layer behind the figure. 3. Fill the selection with black. 4. Move the layer a few pixels up and to the right. You will see (as shown here) that the line on this side of the image is thicker, and if you look closely at the calf, you'll see that it is thicker in the middle than at the edge. NOTE: This only creates the contour line outside the figure. You will need to touch up the areas inside the image (see below). Also pay attention to


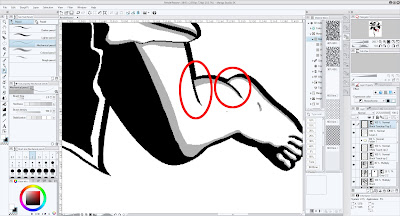
Zoom in on the figure, and you'll see areas
that require additional editing.
Always check the tips of hair, and look closely at fingers, toes, and other small areas. These tend to get gaps that need to be filled.

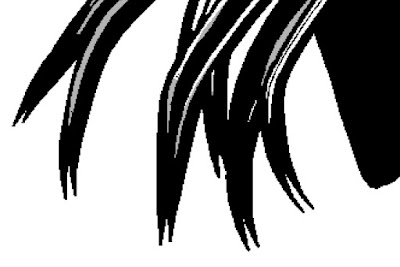
Always check the tips of the hair to see if you are getting duplicate lines.
In this case, I trimmed some and kept the others. It's a matter of personal preference.

Step 11: Applying a Tone Layer
If you plan to print your work (as opposed to just displaying it on the web), a shading tone can add a nice touch of old-school authenticity. You can either drag-n-drop a pre-defined tone from the Materials Panel, or add a Tone Layer. I usually use the Tone Layer because it gives me more control of the final output. I typically replace the Gray Layer with a tone. 1. On the Gray Layer, Select Color Gamut. Then hide the Gray Layer. 2. Create a new tone layer (see below). 3. Pick the settings you want. 4. Click OK and the tone will be created with a layer mask that shows the tone where the gray used to be.

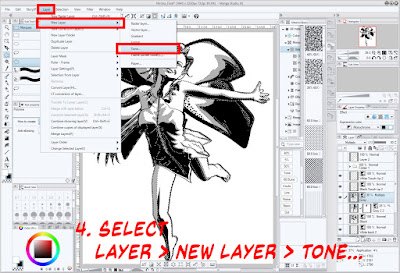
Select Layer > New Layer > Tone...

Step 12: Applying a Color Wash
Sometimes you want a spot of color. Using the same steps as above, Select Color Gamut on the Gray layer, then create a new layer and fill it with a color (I like light blue).

Select the color, then fill the area (CTRL+Del)

Step 13: BONUS: Applying a Quick Sketch Effect
This one is harder to explain; if you're really interested, read the full article. But, in a nutshell, here's a cheat to get a jump start on adding a sketched fill to the Gray layer. In the materials panel, you will find MM04-volcanic eruption (we're using this because it has lots of random lines in it). Drag this on top of the current illustration. Increase its size (don't be afraid to make it huge). Again, use the Select Color Gamut to select the Gray Layer, then create a layer mask to hide the parts of the pattern you don't want to see. With some manipulation (unlink the mask and the material), you can move it around until you have something you like. You will need to add some extra lines and do some touch-up to get the best results from this technique.

I used the sketch technique on this image;
I chose this as an example because it looks
better than when the effect was applied to the fairy.


Step 14: Saving Your Final Image
One of the things that Manga Studio does better than Photoshop is scale down the tone patterns consistently. In other words, it will shrink the image, but keep the line frequency of the dot/line patterns the same. This is VERY useful for print. Chose File > Export and select the appropriate settings for your image (PNG, JPG, TIF, etc.).

And that, dear friends and true believers, is it. This is a one-post summary of the entire process.

NEXT TIME: A "Contents" Launch Page