Normally (in my do-it-by-hand days), I would go through and make rough thumbnails of my pages, then go back and do the following, in order for each page, one at a time:
- Draw panel borders
- Pencil figures & backgrounds (very light backgrounds)
- Add lettering (to make sure it fits)
- Adjust pencils if I need more room or the lettering doesn't fit right)
- Then ink each panel, one-by-one, until the page is finished.
- Then go on to the next page.
But this time, for my all-digital comic, I'm starting off with figures rendered in Poser 11, and they arrive with an "inked line" already on them, including a lot of the shadows and final details present. The difference is, those inked lines are set as material properties (that is to say, I use the Materials Room in Poser to define a thicker Geometric Edge line to clothing than skin (as an example)). This means that if I want to keep the thickness of the inked lines consistent from one panel to the next, I need to render each panel at the size it will be printed (otherwise, if I had to resize the artwork with the transform tool, Nirona the fairy could have thick lines in one panel and thin in the next).
To achieve consistency, I'm actually going through the entire story and setting up my panel layouts and initial lettering FIRST. Now, keep in mind that I've already hand-drawn tight thumbnails, so I have a solid idea of what goes in each panel, and its size relative to the panel borders. In other words, I have a pretty solid idea of what goes where and how big it should be in each panel. If not for laying down the pre-work, I think I would be at a loss for how to approach this.
As I write this ( a few days before this is scheduled to appear in the blog), I'm about half finished laying out the entire book. Hopefully, when this does appear on Wednesday, I'll have this step finished and can move on to fixing the problems I've encountered with my male character's costume – more on that soon.
 |
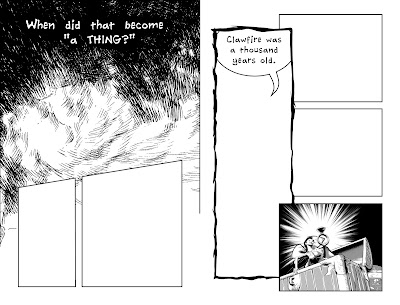
| A sample of pages 6 & 7 from the story. This page is 50% of the final output: I'm working at 800 dpi. © 2017 Mike Mitchell |
Above is a sample of the panels laid out. As you can see, I've even added some of the background and imported the one panel that's completely finished (I might need to reapply the line tones in that panel, as I think it uses a different line frequency than I chose for the entire story). Also, the "rough border" is going to get some more love soon. I want it a lot more jagged and splattery in the final version, but everything here is a quick "rough," so I drew it and now it's time to move on to the next page. AND, the black panel borders on that first page will be completely cut off -- they are in the trim zone for the page.
NEXT TIME: Documenting My Work Settings
No comments:
Post a Comment