Monday, July 31, 2017

Police image chosen as Poser Staff Pick of the Week

Just got some good news! My latest illustration for the story I'm illustrating was selected by the staff at Renderosity to be a "Poser Staff Pick of the Week." You can see the entire list here: https://www.renderosity.com/mod/forumpro/?thread_id=2915631


© 2017 Mike Mitchell

This was one of my early attempts to use Akvis Sketch to create an illustration for publication. Overall, I'm pretty pleased with the results.

Friday, July 28, 2017

Noir Style Tutorial, Pt. 8 - Step 3: Edit Materials

There are a few people I've spoken to who think this step is kind of optional, and for them, it might be. If you're trying to preserve the color in the underlying base image, you can definitely get away with only tweaking the textures, or not editing them at all. I, however, find that the more time spent on the textures, especially the hair, the less post work & clean-up you'll need later. If I'm only going to use a character in one or two panels, and don't think I'll ever need him again, I will skip this process (or go through it quickly). However, for all my principle characters, I can spend days editing the materials and creating custom textures.
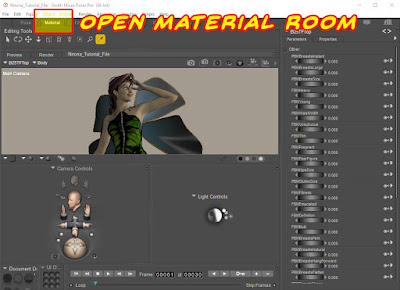
For this example, I turned off the Comic Book Preview so you could
see the base textures without any modification.
Get started by opening the Materials Room, and then use the Material Select tool to start editing the materials and textures of each figure.
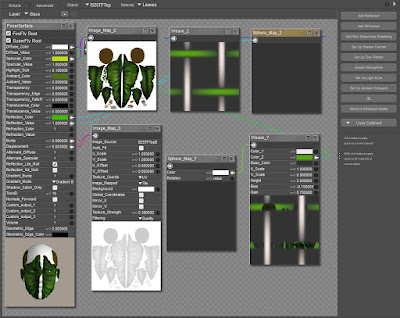
Here we see the Rose Fairy V4 (available from Daz3D.com) textures and materials.
Here you can see there are the expected channels for Diffuse (that's where the color image is added), Bump & Diffuse (adds texture and little details, like the leaf patterns that appear when light plays across the object). As I said before, you should already be at least familiar (if not comfortable) with the Materials Room. It is out of the scope of this tutorial to explain how to use it in detail. What I will do is explain a few key concepts and point out some of the main things you need to know.

One of the most difficult things that experienced Poser artists need to get used to is, that when creating comic book line art,
BUMP MAPS AND COMPLEX TEXTURES
ARE NOT YOUR FRIENDS
.

In photo-realistic renders, bump maps and cool things like sub-surface scattering have the potential to add incredible life-like detail to your images. In line art, which is more about shape and shadow, those cool things you used to rely on will slow down the render process and create unpredictable results. 

Most of the people I know who have tried the Anomaly method and discarded it because they received poor results ignored this key element. They wanted to leave the textures alone and then complained that they were not getting good results.  Once you master this approach, I think you can get good results with some bump and displacement maps in place, because they can add a lot of detail to your line art. But when you are starting out, I really think you'll get better results by deleting most (if not all) of the textures and replacing them with simple colors or leaving them white.
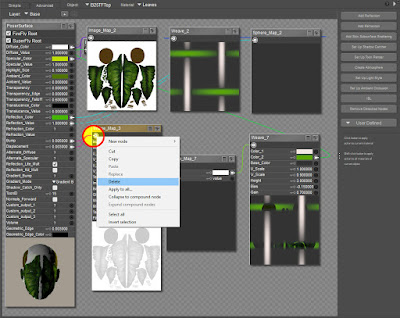
Time to delete the Bump and Displacement Channels. At the VERY least,
you should delete these, otherwise you'll get speckled and bumpy looking shadow edges.

TIP: To delete the material, right-click on the little "Node Connector" icon in the upper-left of each material group. If the "Delete" option is grayed out (and this happens a lot), try clicking on the eye icon to toggle the size of the panel off/on real quick, or make a small change to one of the dials or any other setting. For some reason, sometimes Poser protects the nodes until you make a small change, then it lets you delete the texture.

Most of the time, I delete all the textures and replace them with white. I also adjust the Specular Value way down so I don't get large highlights. Admittedly, this is one of the areas I have the most trouble with, and it takes me a while to find just the right values for the character I'm working on.

I am now going to point out one of the COOLEST features to the Comic Book Preview. If you're familiar with the Cartoon Style wLines Display Style, you may be wondering what the heck is so cool about this. After all, we make simple line art with that setting. But, Poser 11 adds the ability to define each material group's Geometric Edge thickness and color.
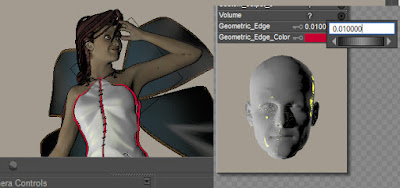
Here, I've made the line very thick and changed
it to red so you can see this cool option.
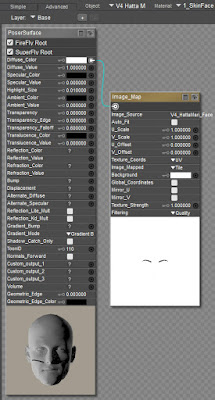
At the very bottom of the Poser Surface parameters, you'll see the settings for Geometric_Edge and Geometric_Edge_Color. By using the selector (eyedropper) tool, you can tweak each of materials individually, and these settings will override the default setting that is in the Comic Book Preview panel.

Materials are set by group, so if you want to strip the color off of the Victoria Model, that can be very time consuming. Fortunately, some nice soul out there created a material preset that converts all of Victoria 4's materials to White, and turns the eyelashes transparent (trust me, this last bit is a blessing, because you don't want funky blocky eyelashes – they look weird in line art).

Link to All White Utility (and it works on M4, too!):
I will provide it when I find the source link. In the meantime, if you need it, email me and I will send it.
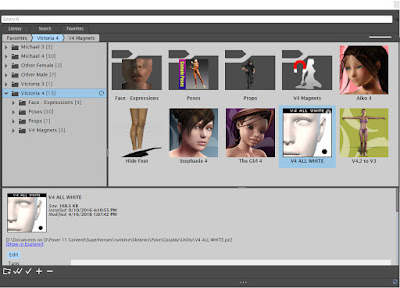
This useful utility pose can save a lot of time by stripping out all image textures
and bump maps, replacing them with simple white, which can then be edited for b&w.

As you can see here, the results are simple, but clean.
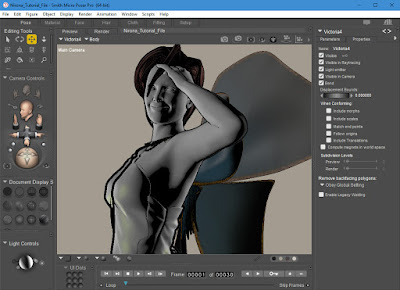
Now that she's very simple, you can go in and adjust colors so they
look great in b&w. Or you could then apply a simple skin tone that would
work well for basic toon and comic book work.

Now that I've got a white figure, it's time to add some custom textures. I edited the existing wing textures in Photoshop and created this:
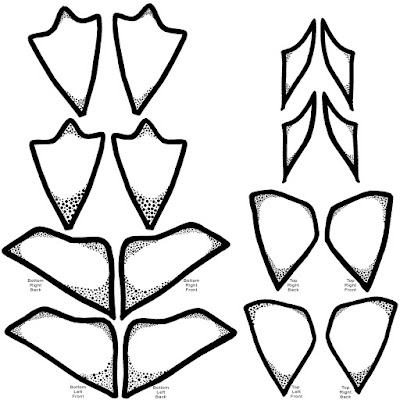
Custom Texture for Enchanted Wings, © 2017 Mike Mitchell
You may download and use this, but may not redistribute it or provide
move it to your own computer to host the image.


Notice that I created textures even for the wings I'm not using right now. I did this in case I change my mind later and want to show them.

In addition to the wings, I always use a custom map for Victoria 4's  face, with only the eyebrows drawn on. Since women often stylize their eyebrows, this simple map works quite well, especially in medium and long shots.

Her lips, as you'll see below, are simple black color. Again, this works well in the highly stylized, stark lighting approach I use in my noir comics.

The lips were set up by just editing the material group for her limps, and then changing the defuse color to black. Sometimes I increase the specular value (i.e. shine) on the lips when I do a close-up, or need more detail.

The usefulness for that sort of thing will become more apparent as we move into the lighting next time. For now, though, it's important to remember what I said earlier: Bump Maps are not your friends. Attempting to create art like this calls for simplification, so that the geometry is the star and the textures, like those wings, are there to provide support.

I'm not also going to contradict myself. When you look at the screenshot below, you'll see that I actually left most of the textures intact on her necklace. I broke my own rules here because my initial test showed that the details on the necklace were actually helping make it stand out more, rather than just fade into her skin.
After stripping out all the other textures, I applied a custom image map
to the wings and her face (eyebrows only). I then left a little color on her
dress and hair so I can see them easier while adjusting the pose.

I did the same thing for her dress and hair. Even though I will be creating b&w art, having these bits of color help me adjust these items while posing the scene. The color makes it easy for me to spot geometry intersections between the props and her body.

I know this section covered a lot, but this is where a big part of the power of the Comic Book Preview comes from. Its key advantages being:

  • You can set the geometric edge width for each material group (selections/assignments made by Material ID)
  • You can easily apply textures that will work in b&w. If you go back and look at Part 5, you can see where I applied the custom stockings pattern and the diamond pattern to her skirt. 
  • Since the geometry is the star, you can add simple colors to either carry over to the final image, or just as helpers.

NEXT TIME: Set-Up Lights

UPDATE 08-18-2017: I cannot get into it here and now, but we do need to talk about hair at some point. Dynamic hair and any sort of strand-based hair is not going to work well with this process. You should look for "toon" hair, or use older hair that is based on geometry shells, rather than hair that replies heavily on transmaps.

Wednesday, July 26, 2017

Noir Style Tutorial, Pt. 7 - Step 2: Turn on Live Comic Book Preview

IMPORTANT: This tutorial only works with Poser 11 and up.
It will NOT work with Daz Studio or earlier versions of Poser.

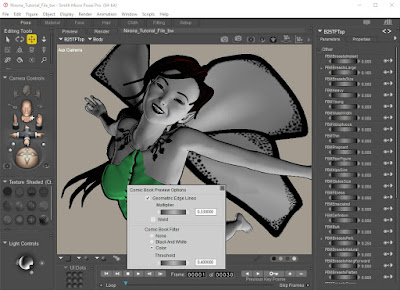
Now that I've got the figure loaded and have some of the various morphs applied, it's time to see what she'll look like in the Live Comic Book Preview Mode. First, locate the Comic Book Preview icon at the bottom of the preview window and click it.

BTW: All the examples in this article, unless otherwise indicated, are completed using the Document Display Style of Texture Shaded.

Click the icon to open the Comic Book Preview Options pane.
The panel will open and you will see a surprisingly small number of options.
[Checkbox]: Geometic Edge Lines (turns edge lines on/off)
[Dial]: Multiplier (set the default line width)
    [Checkbox]: Weld (modifies how seams are handled)
Comic Book Filer (three options)
    [ ] None
    [ ] Black And White
    [ ] Color
[Dial]: Threshold (big number = darker, small number = lighter)

Turning on the Geometric Edge does exactly
what you think it will do: it outlines all geometry.

You can play around with the settings and quickly get a good idea of what they do. Keep in mind, out of the box, the default settings are rough and you're going to get very bad results. You'll need to explore and experiment a little to find something that works for you.

Selecting Black and White has predictable results.

Here's an example of a thinner line combined with color and a significantly lower threshold.

For this image, Geometric Edges are turned on, the line Modifier is set to 0.450000
Color is selected, and the Threshold is set to 0.370000

If you've ever used the Threshold Adjustment in Photoshop (or GiMP), then the dial in the control panel shouldn't come as a surprise. It converts the image to, essentially, a 2-tone graphic, turning grays white when they fall below the threshold setting you select, and simultaneously turning the darker colors black.

You can get an almost pure outline (little shading) simply by adjusting
Threshold setting. Here, we see it set to 0.10000. As you can see,
Poser 11 does a pretty good job of giving you clean, simple outlines.
Something else to remember, this uses the OpenGL drivers on your computer. That means you can combine it with all of the other Document Display modes, such as the wireframe, as seen below.
Geometric Edge Lines are on, Multiplier = 0.660000
Comic Book Filter is set to Color, Threshold = 0.400000


TIP: The line settings use very small numbers. I usually select something between 0.45 and 0.65. Although sometimes I do go as high as 0.80 as my default Geometric Edge thickness.

Keep in mind, you can override this setting in the Materials Room,
as we'll see in the next part of this tutorial.

One of my favorites, especially when I don't want to do a lot of editing on the materials, is to combine Comic Book Preview with Cartoon w/Line. This creates very dramatic shadows. This is my fallback for when I'm in a hurry. Also, remember that you can use the menu settings to adjust whether you see one tone, two tones, three tones, three tones+highlight, etc. You can access these settings under menu: Display > Cartoon Settings.

To summarize the effects of the display settings: 

  • Texture Shaded: Use this if you want to see textures/materials. If you choose any other display setting, you will lose the texture maps.
  • Smooth Shaded: Nice, soft edges to the shadows, but not textures.
  • Cartoon with Line: Adds a little extra thickness to the outer edges; great choice for small models or for when you are having trouble with the edges washing out.
  • Cartoon: Useful if you want to quickly knock out the texture maps and want a cleaner, simpler render.
  • All Other Settings: Wireframes and Hidden Line are fun for when you want a sci-fi look, but in general I don't find them to be useful for making comics.


Close the Comic Book Preview Options window
by clicking on the "X" in the upper-right corner.

THIS IS IMPORTANT:
The Comic Book Preview Options window does not close automatically when you click on another item in the interface (such as when you try to adjust lights or Document Display Style). To close this pane, you must click on the "X" in the upper-right corner.


NOTE: There is a Poser video that also covers this. It's worth checking out:
https://www.youtube.com/watch?v=jE3_V_D1ScE 

NEXT TIME: Step 3: Edit Materials

Friday, July 21, 2017

Noir Style Tutorial, Pt. 6 - Step 1: Figure Set-Up

Enough intro text. It's time to dive right in.

As with any new scene, you open Poser 11, create a new scene (if one wasn't created automatically) and then load your figure, hair, props, etc.

Poser 11 with Victoria 4.2 loaded, along with hair and wings.
DISCLAIMER: I know I said this earlier, but it bears repeating. This is an intermediate tutorial. I'm not going into detail on how to load a figure, load hair and size it to fit the figure, or how to load the props (like these wings). There are scores of tutorials that cover these subjects, so go check with them first before contacting me for more details.

Now, moving right along.

In this screen capture, you can see that I have loaded Victoria 4.2 (hereafter referred to as V4), the Girl 4 Hair, and Enchanted Wings. I will also load the Morphs ++ and Expressions, which are all available in the Victoria 4.2 Starter Bundle from Daz3D.com.

Of course, you can use any figures and wardrobe you want for your own work (if you're following along). The key is to stick with figures that are easy to use in Poser, which means avoiding the Genesis (and all their many descendants) figures.

Detail of screen capture.

Right now, everything in the scene is still default. And, if you look closely, you can see that the wings are semi-transparent (which is something we'll have to deal with, eventually) and that there are these funky little stalks coming out of them. There's nothing wrong with them, per se, but I don't like them and they don't quite match my character concept.

© 2017 Daz Productions, Inc.
For clothing, I will be loading the Rose Fairy V4. By the way, if you're a member of the Daz Platinum Club, you can pick these props up for $1.99 each. In other words, the whole fairy outfit is less than $5, and that includes license to publish images and animations for profit. Here's a look at the promotional art for the combined wings and fairy costume.

For my design, I decided to dispense with the skirt. Considering my intended use for the character in a comic book story I'm working on, the skirt really isn't needed. In fact, I played around with it for a full day before deciding that it just got in the way. The leaf top is low enough to cover her groin, so as long as I'm careful with my camera angles, I shouldn't need the petal skirt. I will have to be careful about shots from the rear, though, as there is no petal back there. Unless I watch it, this rose fairy could become a moon fairy.

As you can see from the promo image for the wings and costume, they're pretty detailed. In fact, I think they look pretty good. But my final character is going to be rendered small (think Tinkerbell size), and all those other details are just going to be distractions. That's why I hid the elements I don't want to see in the final renders.


On the left side of the figure, you can see where I've selected the top wing (identified as  rTopWing at the top of the Properties panel, and I am going to toggle off its Visibility. I already did this for the extraneous items on the other side of the figure. I hid the stalks and two of the wings, leaving me a simple profile that will work well in the finished comic book I'm working on.

NEXT TIME: Turn on Live Comic Book Preview


Wednesday, July 19, 2017

Noir Style Tutorial, Pt. 5 - Process At A Glance

Base Figure Image created in Poser 11, post work in Manga Studio 5,
Background created in Manga Studio 5
Custom legging and skirt textures created in Photoshop
© 2016 Mike Mitchell, Hatta Mari TM 2015 Mike Mitchell
Looking back, I can see that I really haven't put these sections in the proper order. Or, at the very least, I should have included an overview of the workflow when I discussed the required software.

But what's done is done.

At long last, here is a very basic overview of the procedure that I'm calling the Anomaly Process: 
  1. Figure Set-Up (Select & Pose Figure)  [Poser 11]
  2. Turn on Live Comic Book Preview  [Poser 11]
  3. Edit Materials  [Poser 11 & optionally Photoshop]
  4. Set up Lights  [Poser 11]
  5. Adjust Lighting  [Poser 11]
    1. Sidebar: The difference between light types in Poser
  6. Render Settings [Poser 11]
  7. Creating Render Passes  [Poser 11]
  8. Cleaning up Renders  [Photoshop]
  9. Image Clean-Up / Hand-Work / Post Work [Photoshop]
  10. Quick-n-Easy Contour Line [Manga Studio / Clip Studio Paint]
  11. Applying a Tone Layer  [Manga Studio / Clip Studio Paint]
  12. Applying a Color Wash  [Manga Studio / Clip Studio Paint]
  13. BONUS: Applying a Quick Sketch Effect  [Manga Studio / Clip Studio Paint]
  14. Saving Your Final Image
Sounds like a lot, but some of those steps are pretty darned easy, and the first 6 or 7 should be second nature to all Poser users. Some of the techniques in Photoshop and Manga Studio/Clip Studio Paint might be considered intermediate.


You should consider this to be 
an Intermediate-Level Tutorial.


Effects can be layered to achieve different looks.

NEXT TIME: Step 1: Figure Set-Up

Friday, July 14, 2017

Noir Style Tutorial, Pt. 4 - Inspiration

I'm going to take a quick detour in this post and discuss my inspiration for my noir style. A lot of people have compared my work to Frank Miller's seminal work, Sin City. I cannot deny that he's an influence on the look I'm striving (and usually failing) to achieve. But truth be told, he's not my main inspiration. That would fall on other artists like the groundbreaking godfather of modern comics, Will Eisner. Eisner was a true visionary – someone who pushed the bounds of what comics could (and eventually did) become: a legitimate art form.

But as much as I love Will Eisner's line work, amazing use of lines, shadows and soft panels, and as much inspiration as I draw from him, h'es out of my league. I'm not that good. I know that. I accept it; it doesn't bother me. But even though I can't actively copy from it, it does inspire me to always seek to do more with my art, to somehow strive beyond my (very) humble skillset to TRY to achieve "art."

Will Eisner, A Contract With God © 1978
"More than any other book in my collection, A Contract With God transports me to a very specific time in comics history: the late ’70s, when the art form of comics felt alive with possibilities to me but dead as a doornail to Americans in general — a musty, decaying relic of a bygone era. Eisner’s book connected with me as a sign of what comics could be. It wasn’t a product of its time, nor did it seem to rebel against its time. It existed in its own continuum, patiently waiting for the rest of its kind to quietly arrive — by the thousands as it turned out — on the shelves of North American bookstores... The style was cartoony, the body language and facial expressions nearly operatic in their intensity, but there were odd narrative turns and moral ambiguity at play too. The cityscapes and interiors created a strong sense of place, with the authority of a sharp and vivid memory; yet somehow, whatever nostalgia they might’ve evoked, the human drama at the heart of it all felt fresh and new..."
- Introduction to "A Contract With God" by Scott McCloud
So, I think about pose. I think about light. I think about creating pages that move the story forward.

Another influence for me, and probably a more visibly direct one, would be Alex Toth, who is someone who's work I've always been aware of and respected, but I didn't develop a sense of awe for what he accomplished until I was well into my 40s. Despite his use of heavy blacks, he mastered negative space and created a sense of focus that just leaves me in awe. Actual awe. It takes me forever to "read" one of his comics because I keep stopping to admire the lines and brushwork for so long that I lose track of the story and have to go back and read it again.

Recently, I purchased his amazingly fun book, Bravo for Adventure, and I still haven't finished it because I keep stopping to admire the art. This is just such a fun book, and many historians consider it to be Toth's most important single work. I mean, just look at this cover: His body language just conveys a sense of strength and swagger, which is amazing because he's standing still. And notice the single eye and sweet rump of the woman walking by, who is obviously checking out his backside. The bi-planes and his clothing instantly let us know the time period. And his outfit and proximity to the plane tell us he's a pilot. And, dig if you will, that scarf. If this were realistically lit, it should be half in shadow. But Toth uses it as a design element to lengthen his body. That is a LOT of information conveyed in a single image. (Buy it at Amazon; you can get it for $18 - $25 and you'll love it!)

And these are the sort of mindful details I'm trying to bring to my work now. Poses need to advance character or story. People don't stand, they POSE. Shoulders and stance need to convey emotion.

© Alex Toth 1980
I'm not interested in naturalism, I'm interested in STORY. Even if it's a single panel, like the one above, I want to convey something about what's going on. Who is there (and at a glance you should be able to tell who's who). And, of course, there are the shadows. Deep, rich shadows that frame the action and guide our eyes to the focal point of the action.

Finally, and this may come as a surprise, I draw so much inspiration from the man who is without peer as the premier illustrator of the 20th Century: Norman Rockwell.

© 1958 Saturday Evening Post
I've read Rockwell's amazing "autobiography" (if you ever read it, you'll know why I put it in quotes), been fortunate enough to see his work in a museum, and have really enjoyed reviewing it online. The man knew how to tell a story in a single illustration, probably better than anyone else from his era (and, for that matter, he still has few peers). Just look at this classic cover from The Saturday Evening Post.

Even without knowing the painting is titled "The Runaway," we can see that from the iconic bundle-on-a-stick that's lying beneath the kid's stool. And notice that the kid is clean, has a nice haircut, and good clothes. He's not homeless or an orphan. Even the plumpness of the cop gives him a non-threatening "dad body," which means he's probably got kids and knows exactly how to talk to the boy. And that's what's happening here, he's talking and the kid is listening. Oh, and take a look at those motorcycle cop boots. The kid probably made it to the edge of town before the friendly peace officer picked him up and took him to the diner for a soda and a chat.


And look at that bemused expression on the counter man. The story is all here: middle-class kid ran away, friendly cop found him, and you know it's going to be okay. He's going to get home and everything will be okay. And we get all this from a single picture. Note the even more subtle details: bright lights make this a non-threatening location. All the shoulders are slumped/relaxed. No one is yelling or scared. Even the text, "Special Today," tells us something special (or unusual) is happening here at the diner today. These are all subtle indicators that tell the story, and we pick up on them, whether we know it or not.

Even though I'm not trying to imitate Norman Rockwell's style in any way, he is definitely a source of inspiration for me.

NEXT TIME: Process At a Glance

Wednesday, July 12, 2017

Noir Style Tutorial, Pt. 3 - Figure Limitations

Before going any further, I need to mention a few important things about this workflow and how it will be addressed in this tutorial.
  • This is an intermediate tutorial. You already need to have a basic understanding of Poser before you will benefit from the material we're about to cover. Specifically, you need to know:
    • How to load a figure
    • How to find clothing/items in the Library
    • How to open the Materials Room and select/edit a texture
    • How to adjust render dimensions
    • How to adjust render settings
    • How to move lights and modify their properties
    • How to render an image and export it as a PNG
  • You also need to understand the basic limitations of selection a figure for use in Poser. Simply put, you cannot use any of the Genesis figures and their derivatives. Although there are scripts and workarounds, I'm not going to address them. For my work, I am limited to using the following figures:
    • P4 Male ("Dork") and P4 Femal ("Posette")
    • Michael 1 - 4 (and all derivative characters, including Elite)
    • David 1 - 4 (and all his spawn)
    • Hiro (thru version 4)
    • The Kids 1-4
    • Victoria 1 - 4 (and all her related figures, including Stephanie, Aiko and The Girl)
    • Poser Native Figures like: Paul, Pauline, Rex, James, Ben, Jesse, Katie, various toon figures like Rex, Alpha Man, Beta Boy, Gamma Girl, etc. 
    • Hivewire Figures like Dawn and Dusk, Baby Luna, etc.
    • LoRez figures by Predatron
    • Apollo Maxiumus
    • A wide variety of animals, toons, robots, and assorted figures
    • In other words, I'm "limited" to using a huge assortment of figures that are POSER NATIVE. Genesis figures are by Daz3D, and they require a lot of work and tweaking to use properly in Poser.
  • The same thing applies to props, although the Daz Studio DSON importer plug-in usually does a pretty good job of converting Daz clothes and scenery for use in Poser.
  • You can also use FBX (that is to say, game props that were designed for use in Unity and other game engines)
  • Likewise, you can import a lot of OBJ, 3D Max and Lightwave props.
Poser Males - Image created for me by Seliah (Childe of Fyre)
in 2014 as a favor and used by permission.
As you can see from the picture above, I'm hardly "limited" by my options. I have dozens of figures to choose from and thousands of clothing and prop options available.

Now, those of you who have been using Poser and Daz Studio for a long time might be tempted to immediately stop right here. After all, even though Michael 4 and Victoria 4 were immensely popular figures and people are still creating new content for them, they are more than 10 years old and lack modern features like weight mapping and other fancy stuff. Truthfully, if I were creating photo-realistic renders, I would move on to Daz Studio and focus on the latest Genesis figures. But we're not working with photorealism. We're working with the more abstract, and far more forgiving, realm of geometric shapes. 
Michael 3 is an old figure, but with a few morphs and some
texture work, he still creates a stunning noir comic figure.
As you will see, geometry is king and the output format of comics/line art is very forgiving. So, as you experienced Poser / Daz Studio users move on, you're actually going to have to unlearn a few things about textures and bump maps and dare to follow me into the shadows of the noir comics world.

UPDATE [08-16-2017]: I started researching the age of some of these old figures, and got a lot of help from people over at the Daz 3D forums. If you're interested in following our discussion (and hopefully, future updates, you can do so here:

 https://www.daz3d.com/forums/discussion/comment/2734311#Comment_2734311

NEXT TIME: Inspiration


Friday, July 7, 2017

Noir Style Tutorial, Pt. 2 - Tools of the Trade

The technique I am using to create my noir comic look requires the use of Poser 11. I'm sorry to say, I have not been able to replicate this approach with Daz Studio. I think this might work with Carrara, but I have not tested it sufficiently, so I cannot attest to that.

Even so, many of the general principles I will discuss can be used with Daz Studio. But if you are intent on using Daz Studio, I strongly suggest you subscribe to John Garrett's YouTube Channel and sit through his incredibly detailed, and very thoughtful video on what he calls "The Ambient Method." There is also a text write-up here. He gets very solid results, and he uses entirely free software. My method uses software that is purchased.

Required Software:- Poser 11 (pro or base)
- Photoshop CC (any version will do)
- Manga Studio 5 (base or EX, also called Clip Studio)

A few words about the software: Either version of the most current version of Poser will work. It just needs to list "Live Comic Book Preview" under its features. If you're not familiar with Poser, I urge you to get the less-expensive version until you find out if this is something you're going to use on a frequent basis. The Pro version has neat features, but we don't need them for this technique. You can get the base version of Poser 11 for $80 - $130. They have frequent sales, and even though the retail price is $130, you can almost always find it on Amazon for $99. Their main site is SmithMicro.com

I've been using Photoshop professionally since the 1990s. I have no interest in learning how to use GiMP. That being said, GiMP is a great tool and if you're on a budget (or just a fan of open-source software) then you should get it. As you'll see, almost any image editing software will do the small job I require of it.

The Bargains shall be MINE!"
© 2017 Mike Mitchell
You can use almost any version of Manga Studio (it is also called Clip Studio). There is a debut (simple) version and an EX ('extended) version. The biggest difference between them is that the EX version lets you build books, whereas the other version limits you to one page at a time. Honestly, this is not a very important distinction because you can make each page separately (including 2-page spreads) and then combine them in another program, or just save the pages as TIFFs and email them to your printer. This is another Smith Micro product, and retails between $50-$210. There are frequent sales, though, and you can get this for $40-$130 pretty easily.  BTW: When I started this, I only had Manga Studio 4, and it worked perfectly. I only upgraded because I wanted to make sure it would work with my new Windows 10 computer. A friend of mine was interested in digital inking and I found a copy of version 4 (which will work perfectly with this tutorial, by the way!) for only $20. MORAL OF THE STORY: Shop around.


NEXT TIME: Figures & Textures

Wednesday, July 5, 2017

Noir Style Tutorial, Pt. 1 - Introduction

I've been working with a dramatic noir style for a while now and a few people have asked me to write a tutorial on my workflow. I do think this would work better as a video, but I really don't have the time to commit to making the four or five parts I predict it would take to do it justice. So, for now, I'm going to outline the process here and (hopefully) get around to the video late this year or early next.

My noir style, based on
Brian Haberlin's process.
First and foremost, I need to give credit where it is due: This style is based on the work of a very talented and generous artist, Brian Haberlin. He is known for his work on Witchblade, Spawn, Anomaly, and Faster Than Light. Brian is very forthcoming about using Poser and other digital tools like Z-Brush in his work. I was fortunate enough to attend an online webcast he did for Anomaly Productions, which focused on using these tools to create comics.

There are very few single incidents that I can look back at and say, "This changed the way I work." There are a few teachers and classes in college, one particular issue of a fanzine (I was editing the Collectors' Club Newsletter, and I abruptly changed from just trying to get it finished on time to being very mindful of the way I approached it to create something as good as I could possibly make it). The Anomaly Webcast was one of those events.

After this event, I completely changed the way I approached digital comics and using digital tools to create line art. I found a combination of tools and an approach for using them that energized me and my art. And, at the risk of blowing my own horn, other people noticed a change in my work and began to comment favorably on what I was doing.

And that's why we're here – so I can share with you what I'm doing and how I do it. With all that being said, I'm not going to pretend or delude myself into thinking I'm an expert. But this is my workflow, and it works for me because it is relatively fast and repeatable. In other words, I have been able to get consistent results so that I can combine the images into a comic book, which has been my goal ever since I started down this particular path.

NEXT: Tools of the Trade