Showing posts with label Tip. Show all posts

Thursday, August 11, 2022

Make your own icon fonts

 I needed a font that had symbols for the various Microsoft Office documents (Word, Excel, PowerPoint) and the Adobe PDF symbol. Alas, I couldn't find what I needed, so I started looking for a way to make my own icon font. I found a solution in minutes, and it worked perfectly.


Here's the site: fontello.com/

And here's a video on how to use it.


Wednesday, June 30, 2021

Using Poser to Make Comics: Create Custom Library Collections, pt 3

When I finished last week's tutorial, I didn't think there was a Part 3 to this series. But, as I thought about some of my other organizational techniques/practices, I realized that there is one other way I approach the Poser Library that might help give you guys some ideas.

In addition to creating lists of Favorites, you can also create a custom Runtime Library with assets that will be used in your project. In other words, a Project-Specific Library. This could include customized figures (Michael 4 and Victoria 4 are my favorites), poses, buildings, landscapes, and vehicles. 

In addition to making it easy to find the items you're looking for, it also offers you the opportunity to easily make back-ups of all the assets that go into that project. For example, here's a screenshot of my current Runtime structure.

Project-specific libraries are highlighted.
Click image for a larger view.

When I create a Library for a single project, I duplicate a lot of things that are in other Runtimes. For example, the Gutshot Library (shown in the image above) is a collection of my Western assets. This definitely includes duplication with my Architecture Library, and with some stuff in My Library (which is the Daz Studio Library). I tend not to worry about duplicates in this situation because I follow one basic rule: If I start off by using an asset from a project-specific folder, I keep on doing it. In other words, I don't get the Hat out of the Gutshot folder and then get the matching bandana from the Poser 11 folder. That sort of crisscrossing can cause problems in the long run.

At any rate, like the Favorites, I only tend to use this approach when it's a Larger project with a lot of potential for confusion later down the road. With a big visual narrative project, keeping stuff where you can find it is a powerful tool/practice that can really pay off in the end.

Creating Custom Libraries

I'm not going to go through the whole step-by-step process on this process because there are already LOTS of great tutorials on this subject. Here's one that combines text and a great video:  

https://www.posersoftware.com/article/476/how-to-manage-your-poser-library


Wednesday, June 23, 2021

Using Poser to Make Comics: Create Custom Library Collections, pt 2

 Continuing our discussion from last time, we're going to dive into the nitty gritty of exactly how you customize the "Favorites" tab in the Poser Library, and we'll look at the ways I categorize my assets for a comic book story.


How to Save a Favorite Item to the Poser Library


  1. Browse through your Library until you find an item you like (note, it must be a single item, you cannot add a folder).
  2. Click on the "Favorite" icon (it's a star) at the bottom of the Library window.
  3. Open / Expand the Project Folder
  4. (If the folder doesn't exist, create it by clicking on the "New Folder Name" button).
  5. Highlight the sub-folder where you wish to place the item
  6. (NOTE: This is VERY important and easy to forget, so be careful).
  7. Click "OK" button.
  8. The item is now available in the "Favorites" tab in your Library.


One thing of note is that this actually creates a duplicate of the object – not a shortcut. So, if you are short on hard drive space, you might want to be judicious with your Favorites lists.


PRO TIP: If you ever need to reorganize your Favorites, you can right-click on an object and select the "Show in Explorer" option. Once there,  you can move files around. 

This is just one of the methods I've learned to use after significant trial and error, and I know it seems like a lot of work. Really, I get it. There are times when it feels like I'm spending more time "shopping" through my Runtime than I do making art. But, this process delivers numerous benefits, including:

  • Helping me see what I've already got, rather than rushing off to Renderosity or Daz to go buy something that I already have (like sunglasses... Randy needs a pair and I almost bought some, but looking carefully through my stuff, I found I already had a pair that were perfect for him).
  • When I post the image to Daz or Renderosity, this makes it a lot easier to track back to the item so I can list it in the promotional credits.
  • Also helps remind me that, when I do find a great asset, I should go write a review.

I know that a lot of you don't use Poser, so this article may be of limited value to you, but hopefully it will get you thinking about the logistics of creating a big, Visual Narrative projects. So, for you Daz users, the takeaway I want to leave you with is simply this: Using ANY sort of asset organization on a big project will be helpful in the long run.

Wednesday, June 16, 2021

Using Poser to Make Comics: Create Custom Library Collections, pt 1


Getting Started with a Visual Narrative Project


Using Poser to create a comic (or any project that requires a lot of images/renders) consumes a LOT of assets. There are figures, costumes, equipment, vehicles, weapons and numerous other items that will be needed. Like most of you (I imagine), I have MANY thousands of items at my disposal. Purchases, freebies, and who knows what are lurking in my Runtime and it's up to me to find out what's there so i can bring the story out of my head and out into the world.


One of the approaches I use is to think of it as a movie, mentally visualizing the places and people in my story, and then doing a deep search through my Poser Runtime to find the various bits and pieces I might need or want. And this includes selecting different options, especially for clothing. If I were working on a movie, these tasks would be handled by different professionals:

  • For example, some standard movie roles include:
  • Set Designer / Set Construction (interiors)
  • Location Supervisor (exteriors)
  • Wardrobe (clothes, sunglasses, wristwatch)
  • Prop Master (guns, crucifixes, wooden stakes, possibly cars)
  • Hair & Makeup specialists
I'm not even including all the lighting and other stuff, such as "casting" because we kind of create our characters, rather than find them (at least partly – I frequently do look for pre-existing characters in my library and use them if they look right for the part; this is especially true for minor/background characters).

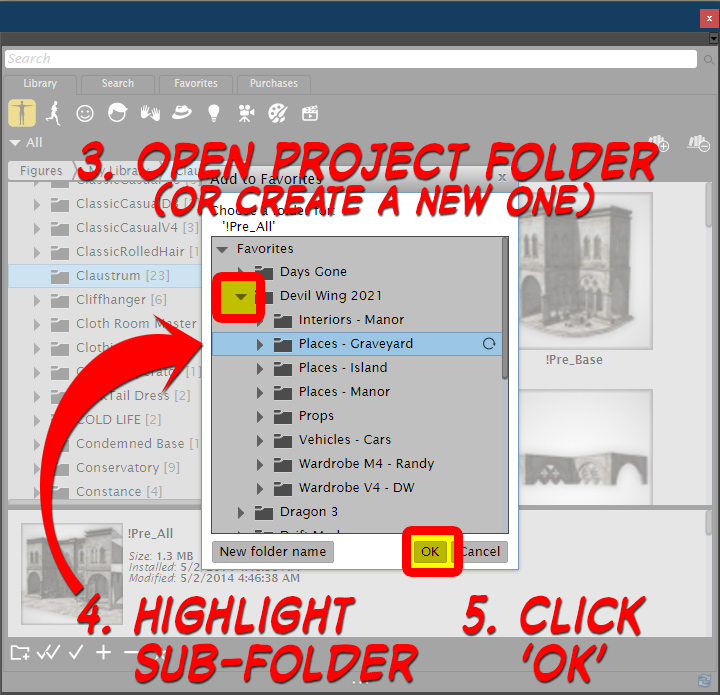
So, back to the tip I'm trying to summarize.

Poser has a great feature in the Library called FAVORITES, which is a fantastic way to organize assets. For a new project, I will open the Library and, on the Favorites tab, I will create a Project Folder (in this case, "Devil Wing 2021"). Then, I will go through my Runtime and look for the various items I will need and save the various items to separate, organized folders. As you can see in the attached screenshots, the folder names are pretty specific to what's in them.

In this case, that includes places/locations (the two big scenes take place in a mansion and in a graveyard, but I will also need some other assets, like a cityscape (she flies over it on her way to the graveyard) and a Greek island (flashback) and I'll also need trees and shrubs to flesh out those locations), interior (mansion interior includes long hallway, library, occult "study" room, & some other room yet to be determined). I'm not sure I'll need a vehicle this time, but I might in the future, so I tagged a few that I like. And, of course, I need to dress the characters (wardrobe) – for them, I will have different folders for each character, and possibly for different scenes (for instance, fancy dress versus casual).

SIDE NOTE: If the project goes beyond this initial two-issue short story, I would create a more detailed "Call List / Catalog" in Excel or Word (or the Google Docs equivalents) to better organize things and make it easier for me to sort out the various references and image credits.

NEXT TIME: Step-by-step instructions on how to create custom collections in your Poser Library.

Wednesday, June 9, 2021

Gaming Mouse is VERY Useful in 3D

 Last year I wrote a quick review about my recent purchase of a gaming mouse to assist with my work: http://mikemitchellonline.blogspot.com/2020/08/tip-use-gaming-mouse-with-poser-and-daz.html

I was pretty new to the whole thing back then, but a year or so later and I must amend my report to say that this mouse is a fantastic addition to my toolkit. I'm extremely happy with it and now really can't see how I got along without it.

I never did get the hang of those marco buttons on the side, so I removed them. What turns out to be invaluable is the ability to change resolution (i.e. sensitivity) at the touch of a button. The allows me to make very fine adjustments to the dials in Poser.

The mouse has these possible settings:

More Hand Movement << 1200-2400-4800-6200-8000-12000 DPI  >> Less Hand Movement


I usually keep it on 4800, which has a nice feel and speed to it. But, when I need to move the dials to make minute light adjustments in Poser, I just press the button on top of the mouse and suddenly it takes a lot more motion to move things, which means I have a lot more control of the final outcome.


Wednesday, February 26, 2020

Making Comics: Nebula Background

My online buddy and fellow space enthusiast, tkrobert, asked how I created the nebula background in my recent space illustration (see Wednesday's post), so I thought I'd share that answer with you guys.

It's a remarkably easy process. The ship is, of course, on its own layer(s). So, to create the background:

  1. Set background layer to solid black.
  2. Go to nasa.gov and search their gallery for "nebula." (Their space images are generally free for personal and commercial use - just don't use the NASA logo or photos of people.)
  3. Once you have an image you like (look for things with nice, abstract patterns and high-contrast areas), paste it into your image editing software on a layer between the black background and the ship.
  4. Photoshop/GIMP, etc.: Play around with the following filters: Poster Edges, Stamp, Find Edges. Mix-and-match effects until you get something nice and abstract. You might also want to play around with Levels or Contrast. Then I convert the layer to b&w. Personally, I like the strong posterized look (sharp deleniations between the colors, but you can easily go for a softer, more gentle look).
  5. Adjust the nebula layer's opacity (usually 30% - 50% works well.
  6. Just move the nebula around until it works with the composition. 

A side note on composition: In the case of a ship being dead center of the frame, I tend to put the brighter parts behind it, near the exhaust areas. Also, because I planned to use those white motion lines in front of the ship, I left that part of the background completely black (note that there aren't even any stars). I did this to simplify things, because those speed lines quickly clutter things up.

I spent significantly more time playing around with the white lines than I did creating the background (in this case, I used some version of "find edges" filter in Clip Studio Paint (not Photoshop) because I wanted to do all the work in CSP.

I learned/self-taught myself this technique when I was working on the illustrations I created for the Galaxy Prime Role Playing Game.

Thursday, May 10, 2018

Excel - Get URLs from a range

I'm storing this info here so I can find it later. I have a spreadsheet with a lot of URLs stored in a column (more than 150). The URLs are embedded in files stored on a remote server so when you click on the file it will take you to the file.

Great, except I need the actual hyperlink info. I could get the URL by right clicking then cutting/pasting each file, but that would take hours. So I need a custom function or macro to extract them for me.

The basic info is copied from this location:
https://excel.tips.net/T003281_Extracting_URLs_from_Hyperlinks.html


The cure for tedium—like them or not—is a macro. With a macro, getting at the underlying URL for a hyperlink is child's play. All the macro needs to do is pay attention to the Address property of the hyperlink. The following is an example of a macro that will find each hyperlink in a worksheet, extract each one's URL, and stick that URL in the cell directly to the right of the hyperlink.
Sub ExtractHL()
    Dim HL As Hyperlink
    For Each HL In ActiveSheet.Hyperlinks
        HL.Range.Offset(0, 1).Value = HL.Address
    Next
End Sub
Instead of a "brute force" macro, you could also create a user-defined function that would extract and return the URL for any hyperlink at which it was pointed:
Function GetURL(rng As Range) As String
    On Error Resume Next
    GetURL = rng.Hyperlinks(1).Address
End Function
In this case you can place it where you want. If you want, for example, the URL from a hyperlink in A1 to be listed in cell C25, then in cell C25 you would enter the following formula:
=GetURL(A1)
ExcelTips is your source for cost-effective Microsoft Excel training. This tip (3281) applies to Microsoft Excel 97, 2000, 2002, and 2003. You can find a version of this tip for the ribbon interface of Excel (Excel 2007 and later) here: Extracting URLs from 


How to create a custom function
That's all good and fun, but it doesn't tell me how to create a custom function. So, here's another source:
http://www.dummies.com/software/microsoft-office/excel/how-to-create-custom-excel-functions/


BEFORE YOU PROCEED, you will need to go into your Excel settings and, in the File > Options you need to edit the Auto correct setting that automatically turns URLs into hyperlinks.
  1. Press Alt + F11.
    This gets you to the Visual Basic Editor, where VBA is written.
    You can also click the Visual Basic button on the Developer tab of the Ribbon. The Developer tab is visible only if the Developer checkbox is checked on the Customize Ribbon tab of the Excel Options dialog box.
  2. Choose Insert→Module in the editor.
    You have an empty code module sitting in front of you. Now it’s time to create your very own function!
  3. Type this programming code, shown in the following figure:
    Writing your own function.
    Writing your own function.
  4. Function GetURL(rng As Range) As String
        On Error Resume Next
        GetURL = rng.Hyperlinks(1).Address
    End Function
  5. Macros and VBA programming can be saved only in a macro-enabled workbook.
    After you type the first line and press Enter, the last one appears automatically. This example function adds two numbers, and the word Public lists the function in the Insert Function dialog box. You may have to find the Excel workbook on the Windows taskbar because the Visual Basic Editor runs as a separate program. Or press Alt+ F11 to toggle back to the Workbook. Save the file as a Macro-Enabled Excel file (necessary).
  6. Return to Excel.
  7. Click the Insert Function button on the Formulas tab to display the Insert Function dialog box.
    Finding the function in the User Defined category.
    Finding the function in the User Defined category.
  8. Click OK.
    The Function Arguments dialog box opens, ready to receive the arguments. Isn’t this incredible? It’s as though you are creating an extension to Excel, and in essence, you are.
    Using the custom Add function.
    Using the custom Add function.

BTW: I am not copying this here to rip off anybody's content. I'm just storing it here in case the original links ever go away.


Saturday, January 6, 2018

MS Word - Search for all Instances of Superscript or Subscript in a Document

Right now I am proofing a technical document for the oil and gas industry. One of the things I'm doing is copying the text from a badly formatted source file and pasting it into a new, clean document and tagging all the paragraphs with the correct styles. Some of the original formatting is very bad, so this is the fastest way to do this.

Prior to cutting the text, I use the Clear All Formatting tool (it's on the Home Tab in the Font Group) to strip out everything from the source text. This gives me a clean block of text to paste into the new document. Unfortunately, this also clears out superscripts and subscripts. After pasting the text, I compare the two documents and retag the appropriate text (CO2 becomes CO2, for example).

But, when it comes time to proof, I need to go through the entire source document and search for all instances where the author used a subscript or a superscript. In a long document after a busy day, I can't rely on my eyes to catch each and every tiny number or letter. So, I found this process at this site, and it allows MS Word to find and highlight all instances of subscript (and a second pass finds the superscripts) using the standard Find/Replace tool in MS Word.

Thanks to Allen Wyatt for posting this great MS Word Tip:
https://wordribbon.tips.net/T013110_Easily_Finding_Superscripts.html

Since it's his material, I'm not going to reprint it here without permission. Just follow the link and thank him for this ingeniously simple, but useful, power user tip.

Monday, December 11, 2017

MS Word – Find Text, Replace with Clipboard Contents

Here's a useful tip that can help in a variety of situations.


  • Scenario 1: You want to replace a string of text with a graphic (maybe replace the company's name with a graphic version of it, or want to replace a mathematics formula with a PNG graphic of it so that it will not be changed across mobile devices.
  • Scenario 2: You want to find and replace a string of text that has formatting in it, like a subscript or superscript (H2S = H2S, or 1st = 1st).
Here's a way to quickly do that.
  1. In the word doc (or elsewhere) find the thing you want to copy (graphic, properly formatted text, whatever).
  2. Copy it (CTRL+C, or from the menu).
  3. Use the Find/Replace command in MS Word (CTRL+H)
  4. In the Find What field, enter the string of text you want to find.
  5. In the Replace with field, enter this: ^c (the first character is found by typing SHIFT+6).
  6. Now, whenever you use the find/replace, it will paste the contents of your clipboard.

HOW IT WORKS: This technique replaces whatever you are searching for with whatever you have in the clipboard.

That's it. A very simple solution to an annoying problem.


Tuesday, June 30, 2015

MS Word - Align Tabs

I don't usually post things like this, but this is useful and I want to make sure I can find it later.

https://cybertext.wordpress.com/2014/07/25/word-auto-aligning-headerfooter-info-in-portrait-and-landscape-pages/ 

This tip is for Word 2007 & 2010. It details how to insert a special tab character that moves with the page margin when inserting landscape pages into a portrait document. The tab is called an Align Tab and it is very useful.