Tuesday, October 31, 2017

Happy Halloween - Afterlife with Archie

Happy Halloween!


It's time for witches to fly and the dead to rise!
Let the wind blow, let the mad seethe, 
The time has come for the dead to breathe!

It's HALLOWEEN, folks! Time to get your scare on! Especially if you're from Riverdale and wander into my front yard and drink in this scene of terror!

Yeah, that's all-American boy Archie Andrews battling
his former best-pal Jughead Jones.

And yes, these are life-size figures in my
front yard, illuminated by black light.

Machete-in-hand, Archie will avenge the fallen members of his gang.

Hot Dog is just looking for a bone to gnaw...

Even the rotten shall fall to Juggie's inhuman hunger!
I guess there's just no accounting for taste!


Most of the scene is illuminated by some SERIOUS black light (I'm not kidding, my last year I needed 7 black lights to light up this scene, but my new 36W black light spotlight is so powerful that it handles almost all of the power. I am using it and only one small 10W bulb as a fill-light for Archie's britches.

There are also night lights inside the masks. And a small misting of orange florescent paint on Archie's mask and hands to make them illuminate in the UV lighting. Until I added that (and the three night lights in Archie's head), he wasn't showing up at night (and since tick-or-treat is after dark, that's very important.

Friday, October 20, 2017

Making Comics: A few Resources

Recently, someone at the Daz3D.com forums posted some character designs and said he wanted to use Daz Studio to create a graphic novel in the next year. I critiqued his illustrations (decent character designs, but the lighting was a bit off, I thought).

I also posted the following response, which I thought I'd share here with you guys.

As someone who is also working on some comics projects, if I may make one suggestion, it be to read some books about drawing comics (specifically laying them out and lettering them). You see, that's where most of the people who use 3D to make comics come up short. They produce beautiful single images, but they don't flow like a comic should. Of course, this is just my opinion.
 Here are some resources I would suggest:
  • How to Draw Comics the "Marvel" Way by Stan Lee and John Buscema
    This is an oldie, but a goodie. It can completely revolutionize the way you look at framing, laying out your panels, and telling a story. Available at Amazon from $10 up.
  • Drawing Crime Noir: For Comics and Graphic Novels by Christopher Hart
    Even if you're not drawing a crime noir comic, this is a GREAT resource for moody lighting and creating interesting characters that "pop." At Amazon for about $11.
  • Making Comics: Storytelling Secrets of Comics, Manga and Graphic Novels by Scott McCloud
    This is a heftier read, and not quite the down-n-dirty basics of the other two books, but it really gives you a high-level understanding of what should go into a good comic story and then drills down to specifics. Amazon: About $20.
There are NUMEROUS other books I could recommend, but these are the three I would start with, and I have listed them in order of importance to anyone creating a comic for the first time.

In regards to lettering, I highly recommend this free, online series by pro letterer Nate Piekos, who also runs the Blambot Foundry (and, by the way, he has some great FREE fonts at his site, too). His lettering tips can be found here: http://blambot.com/articles_tips.shtml

Wednesday, October 18, 2017

Days Gone 5 - Documenting My Workspace

Just a short post this time, I'm afraid. As I've said, this is the first time I'm using the multi-page story feature that is available in the "EX" edition of Manga Studio / Clip Studio Paint. In the past, I made each page separately and just combined them manually later in InDesign or QuarkXPress.

This time, however, I wanted to keep all the settings consistent from one page to the next, and as such, I've done two things that are new for my comics work:

  • I created a binder to store all the materials in one place (typically, I used file folders)
  • I made screenshots of my settings and put them into the binder.

I documented my settings with a few screenshots
of the applicable menus, and some notes.
I whipped this up in Photoshop in about 10 min.
As you can see, there's not a lot of detail here, but just enough so I can document what I did at each step of the production cycle. If I can get ahead at all, I plan to document all the props and parameter settings used for the major characters in the story. But, since I'm already falling behind, I think that's unlikely for this project.

Here's a shot of the binder.

My project binder for the Days Gone story.

As you can see, I've tipped in the sheet with the project settings (this is configured for printing at Comix Wellspring; the same company that quickly printed my comic, Fanzine Flashback: Ultra #1).

This is, of course, the sort of thing I do with my professional technical writing projects. Organization is essential to finding what you need when you need it. I'm hoping the small amount of time I've spent on project management will pay off in the end.

NEXT TIME: Ummm... not sure. Maybe some updated character designs? Or something else.

Friday, October 13, 2017

Days Gone 4 - A Short Complaint About Manga Studio (Clip Studio Paint)

This short story is the first long project I've created in Manga Studio 5 (aka Clip Studio Paint). I've got t admit, I'm finding the new story features to be a bit frustrating. Things that should be easy are actually quite difficult.

For example, I have a layout where I want three equal-sized panels at the bottom of the page with a standard border gutter between them. There's not a single layout in the Frame Materials that has this (in fact, I think someone could clean-up if they made a really GOOD package of frames with lots of options -- but considering how hard it is to bulk load materials, that wouldn't be a good product unless it came with an installer).

Now, MS/CSP does have a split panel option that you can use. And it does the job. You draw one panel and it will split it into three. BUT... and this is a BIG but... it doesn't automatically add the gutters. And there is no way to automatically distribute the three panels horizontally (like you can in InDesign and even PowerPoint). It's little shortcomings like this (and the ability to enter numeric values for the size of the vector frames) that makes this feel more like an advanced hobbyist software rather than a professional-grade tool.

Now, I know a lot of this could just be that I'm not really that familiar with digging deeper into the interface to find the tools I need (and while searching, I did find some really cool new features in the Rulers section, that I will definitely be using soon). But, that's not all of it. I have been a graphics professional for decades and I know the types of tools and features to expect in modern, pro-level software. So far, although Manga Studio / Clip Studio Paint has a LOT to offer, it has a lot of shortcomings.

NEXT TIME: Documenting My Working Environment

Wednesday, October 11, 2017

Days Gone 3 - Changing My Workflow

I've made a few comics in the past, mostly by hand and in a loose, cartoonish style (when I drew it myself), and I had a definite approach and workflow. I thought I'd mention that, for the DAYS GONE story, I'm doing it a bit differently this time.

Normally (in my do-it-by-hand days), I would go through and make rough thumbnails of my pages, then go back and do the following, in order for each page, one at a time:

  1. Draw panel borders
  2. Pencil figures & backgrounds (very light backgrounds)
  3. Add lettering (to make sure it fits)
  4. Adjust pencils if I need more room or the lettering doesn't fit right)
  5. Then ink each panel, one-by-one, until the page is finished.
  6. Then go on to the next page.


But this time, for my all-digital comic, I'm starting off with figures rendered in Poser 11, and they arrive with an "inked line" already on them, including a lot of the shadows and final details present. The difference is, those inked lines are set as material properties (that is to say, I use the Materials Room in Poser to define a thicker Geometric Edge line to clothing than skin (as an example)). This means that if I want to keep the thickness of the inked lines consistent from one panel to the next, I need to render each panel at the size it will be printed (otherwise, if I had to resize the artwork with the transform tool, Nirona the fairy could have thick lines in one panel and thin in the next).

To achieve consistency, I'm actually going through the entire story and setting up my panel layouts and initial lettering FIRST. Now, keep in mind that I've already hand-drawn tight thumbnails, so I have a solid idea of what goes in each panel, and its size relative to the panel borders. In other words, I have a pretty solid idea of what goes where and how big it should be in each panel. If not for laying down the pre-work, I think I would be at a loss for how to approach this.

As I write this ( a few days before this is scheduled to appear in the blog), I'm about half finished laying out the entire book. Hopefully, when this does appear on Wednesday, I'll have this step finished and can move on to fixing the problems I've encountered with my male character's costume – more on that soon.

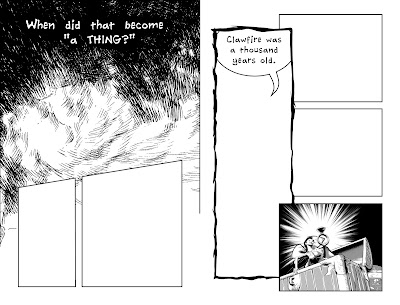
A sample of pages 6 & 7 from the story.
This page is 50% of the final output: I'm working at 800 dpi.
© 2017 Mike Mitchell

Above is a sample of the panels laid out. As you can see, I've even added some of the background and imported the one panel that's completely finished (I might need to reapply the line tones in that panel, as I think it uses a different line frequency than I chose for the entire story). Also, the "rough border" is going to get some more love soon. I want it a lot more jagged and splattery in the final version, but everything here is a quick "rough," so I drew it and now it's time to move on to the next page. AND, the black panel borders on that first page will be completely cut off -- they are in the trim zone for the page.

NEXT TIME: Documenting My Work Settings

Friday, October 6, 2017

Manga Studio (aka Clip Paint Studio): How to Save Custom Panel Layouts

I'm working on the Days Gone comic story, and am doing my first multi-page file in Manga Studio 5 EX (this is one of the few differences between the PRO version and the EX version: the ability to have multiple pages in the same file). The advantage to this is that it will maintain consistency between the tone frequency and panel border thickness -- all useful things in a story (as opposed to doing it manually page-by-page).

I have two layouts that repeat on two pages: two panels at the top and one big panel at the bottom. And this looks like a layout I might want to use in the future, so I went to YouTube to find a tutorial on it -- and found a great one.


The video is about 10 minutes long, and WORTH WATCHING in its entirety. However, if you just want to know how to save a design as a custom layout (i.e. material), then jump to the 9 min mark.

NEXT TIME: Character Designs (and maybe some stuff on dynamic clothing)
Update Oct. 08, 2017: Turns out, next time we're talking about workflow issues. I'll get back to character design shortly.

Wednesday, October 4, 2017

Days Gone 2 - Starting a "New" Comics Project, Part Two

As you may recall from last time, earlier in 2017 I was cleaning up some scans for some mini-comic I had published back in 1989 and 1990. While doing so, I got the bug to write a new story. Now, sometimes when I write, I do it as a script. Other times, I actually sketch out rough thumbnails of the layout, and include the dialogue and captions.

This time, I did the latter: I grabbed some paper, a ballpoint pen and whipped the whole thing up in short order.

My thumbnails tend to be very rough and very fast...
even moreso when I'm drinking Irish Whiskey.

As I explained last time, I sipped a little Irish Whiskey and, over the course of two evenings, whipped up an 8-page script with breakdowns for a new fantasy story that would roughly fit into my "Days Gone" series.

And then the pages sat in my drawer until, sometime later, I decided that I wanted to complete this and add it to the FANZINE FLASHBACK comic I was planning (see last week for details). But this time I didn't want to do it with my old cartoon style. I wanted to do it with my 3D workflow using my current noir style (or something close to it). Part of my motivation is that I really want to quit dabbling with single illustrations and random comic pages, and actually finish a complete story this year.

And Days Gone #3 is a perfect candidate for that, for the following reasons:

  • It's short (8 pages, but I think it will grow to 10)
  • Small number of characters (hero, faerie and dragon)
  • Two scenes/sets (mountain landscape external, dragon's cave internal)
  • Reasonable but solid deadline (mid November 2017)

The deadline, btw, stems from the fact that I will be publishing this in the Collectors' Club Newsletter

So, that's where we are. I'm starting a new project. I've already designed the two main figures (yeah, the faerie from my Noir Style Tutorial is designed to go in this story), leaving me only the dragon and the sets (which I have already started on).

Stay tuned -- I'll keep you posted on how it's progressing.