Showing posts with label Poser Tips. Show all posts

Wednesday, June 30, 2021

Using Poser to Make Comics: Create Custom Library Collections, pt 3

When I finished last week's tutorial, I didn't think there was a Part 3 to this series. But, as I thought about some of my other organizational techniques/practices, I realized that there is one other way I approach the Poser Library that might help give you guys some ideas.

In addition to creating lists of Favorites, you can also create a custom Runtime Library with assets that will be used in your project. In other words, a Project-Specific Library. This could include customized figures (Michael 4 and Victoria 4 are my favorites), poses, buildings, landscapes, and vehicles. 

In addition to making it easy to find the items you're looking for, it also offers you the opportunity to easily make back-ups of all the assets that go into that project. For example, here's a screenshot of my current Runtime structure.

Project-specific libraries are highlighted.
Click image for a larger view.

When I create a Library for a single project, I duplicate a lot of things that are in other Runtimes. For example, the Gutshot Library (shown in the image above) is a collection of my Western assets. This definitely includes duplication with my Architecture Library, and with some stuff in My Library (which is the Daz Studio Library). I tend not to worry about duplicates in this situation because I follow one basic rule: If I start off by using an asset from a project-specific folder, I keep on doing it. In other words, I don't get the Hat out of the Gutshot folder and then get the matching bandana from the Poser 11 folder. That sort of crisscrossing can cause problems in the long run.

At any rate, like the Favorites, I only tend to use this approach when it's a Larger project with a lot of potential for confusion later down the road. With a big visual narrative project, keeping stuff where you can find it is a powerful tool/practice that can really pay off in the end.

Creating Custom Libraries

I'm not going to go through the whole step-by-step process on this process because there are already LOTS of great tutorials on this subject. Here's one that combines text and a great video:  

https://www.posersoftware.com/article/476/how-to-manage-your-poser-library


Wednesday, June 23, 2021

Using Poser to Make Comics: Create Custom Library Collections, pt 2

 Continuing our discussion from last time, we're going to dive into the nitty gritty of exactly how you customize the "Favorites" tab in the Poser Library, and we'll look at the ways I categorize my assets for a comic book story.


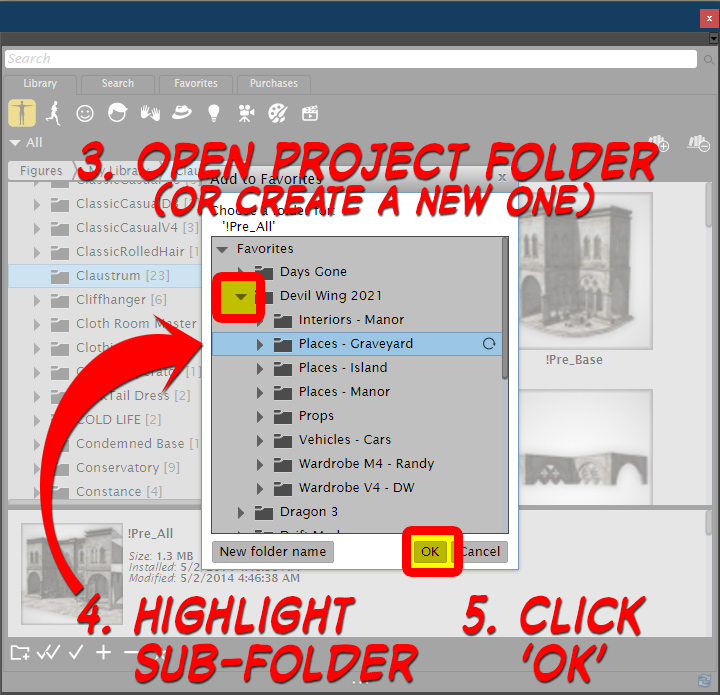
How to Save a Favorite Item to the Poser Library


  1. Browse through your Library until you find an item you like (note, it must be a single item, you cannot add a folder).
  2. Click on the "Favorite" icon (it's a star) at the bottom of the Library window.
  3. Open / Expand the Project Folder
  4. (If the folder doesn't exist, create it by clicking on the "New Folder Name" button).
  5. Highlight the sub-folder where you wish to place the item
  6. (NOTE: This is VERY important and easy to forget, so be careful).
  7. Click "OK" button.
  8. The item is now available in the "Favorites" tab in your Library.


One thing of note is that this actually creates a duplicate of the object – not a shortcut. So, if you are short on hard drive space, you might want to be judicious with your Favorites lists.


PRO TIP: If you ever need to reorganize your Favorites, you can right-click on an object and select the "Show in Explorer" option. Once there,  you can move files around. 

This is just one of the methods I've learned to use after significant trial and error, and I know it seems like a lot of work. Really, I get it. There are times when it feels like I'm spending more time "shopping" through my Runtime than I do making art. But, this process delivers numerous benefits, including:

  • Helping me see what I've already got, rather than rushing off to Renderosity or Daz to go buy something that I already have (like sunglasses... Randy needs a pair and I almost bought some, but looking carefully through my stuff, I found I already had a pair that were perfect for him).
  • When I post the image to Daz or Renderosity, this makes it a lot easier to track back to the item so I can list it in the promotional credits.
  • Also helps remind me that, when I do find a great asset, I should go write a review.

I know that a lot of you don't use Poser, so this article may be of limited value to you, but hopefully it will get you thinking about the logistics of creating a big, Visual Narrative projects. So, for you Daz users, the takeaway I want to leave you with is simply this: Using ANY sort of asset organization on a big project will be helpful in the long run.

Wednesday, June 16, 2021

Using Poser to Make Comics: Create Custom Library Collections, pt 1


Getting Started with a Visual Narrative Project


Using Poser to create a comic (or any project that requires a lot of images/renders) consumes a LOT of assets. There are figures, costumes, equipment, vehicles, weapons and numerous other items that will be needed. Like most of you (I imagine), I have MANY thousands of items at my disposal. Purchases, freebies, and who knows what are lurking in my Runtime and it's up to me to find out what's there so i can bring the story out of my head and out into the world.


One of the approaches I use is to think of it as a movie, mentally visualizing the places and people in my story, and then doing a deep search through my Poser Runtime to find the various bits and pieces I might need or want. And this includes selecting different options, especially for clothing. If I were working on a movie, these tasks would be handled by different professionals:

  • For example, some standard movie roles include:
  • Set Designer / Set Construction (interiors)
  • Location Supervisor (exteriors)
  • Wardrobe (clothes, sunglasses, wristwatch)
  • Prop Master (guns, crucifixes, wooden stakes, possibly cars)
  • Hair & Makeup specialists
I'm not even including all the lighting and other stuff, such as "casting" because we kind of create our characters, rather than find them (at least partly – I frequently do look for pre-existing characters in my library and use them if they look right for the part; this is especially true for minor/background characters).

So, back to the tip I'm trying to summarize.

Poser has a great feature in the Library called FAVORITES, which is a fantastic way to organize assets. For a new project, I will open the Library and, on the Favorites tab, I will create a Project Folder (in this case, "Devil Wing 2021"). Then, I will go through my Runtime and look for the various items I will need and save the various items to separate, organized folders. As you can see in the attached screenshots, the folder names are pretty specific to what's in them.

In this case, that includes places/locations (the two big scenes take place in a mansion and in a graveyard, but I will also need some other assets, like a cityscape (she flies over it on her way to the graveyard) and a Greek island (flashback) and I'll also need trees and shrubs to flesh out those locations), interior (mansion interior includes long hallway, library, occult "study" room, & some other room yet to be determined). I'm not sure I'll need a vehicle this time, but I might in the future, so I tagged a few that I like. And, of course, I need to dress the characters (wardrobe) – for them, I will have different folders for each character, and possibly for different scenes (for instance, fancy dress versus casual).

SIDE NOTE: If the project goes beyond this initial two-issue short story, I would create a more detailed "Call List / Catalog" in Excel or Word (or the Google Docs equivalents) to better organize things and make it easier for me to sort out the various references and image credits.

NEXT TIME: Step-by-step instructions on how to create custom collections in your Poser Library.

Wednesday, June 9, 2021

Gaming Mouse is VERY Useful in 3D

 Last year I wrote a quick review about my recent purchase of a gaming mouse to assist with my work: http://mikemitchellonline.blogspot.com/2020/08/tip-use-gaming-mouse-with-poser-and-daz.html

I was pretty new to the whole thing back then, but a year or so later and I must amend my report to say that this mouse is a fantastic addition to my toolkit. I'm extremely happy with it and now really can't see how I got along without it.

I never did get the hang of those marco buttons on the side, so I removed them. What turns out to be invaluable is the ability to change resolution (i.e. sensitivity) at the touch of a button. The allows me to make very fine adjustments to the dials in Poser.

The mouse has these possible settings:

More Hand Movement << 1200-2400-4800-6200-8000-12000 DPI  >> Less Hand Movement


I usually keep it on 4800, which has a nice feel and speed to it. But, when I need to move the dials to make minute light adjustments in Poser, I just press the button on top of the mouse and suddenly it takes a lot more motion to move things, which means I have a lot more control of the final outcome.


Saturday, August 15, 2020

TIP: Use a gaming mouse with Poser and Daz Studio

A "gaming mouse" is a useful tool for using Poser and Daz Studio, as well as Clip Studio Paint. 

My mouse has a feature on it that lets me adjust its sensitivity (i.e. dpi) with small buttons next to the track wheel. I normally keep it at 4800, which lets it whip around the screen at a nice speed that is pretty much synced to my hand movements. In other words, it moves at a nice speed and it's easy for me to track my mouse. At the max setting of 12,000 dpi, the mouse accelerates very rapidly so that a small movement on the mousepad will send the pointer on the screen zipping almost across the entire width of a 27-inch monitor.

BUT, when I need to be more precise (like just a few minutes ago when I was trying to get make some tiny adjustments to a camera placement in Poser), I can decrease the sensitivity of the mouse with two clicks and suddenly large mouse movements equal small movements on the screen. This enables me to get more precise results. All with the click of a few buttons right on the mouse. This is much easier than going to the Mouse settings in the Windows Control Panel.


This is the mouse I have, but there are lots of others available with similar features.


Below I'll link to the mouse I have (Win 10), but this one has features that it turns out I don't need (the replaceable side panels and macro-enabled buttons turned out to be something I just couldn't make myself fit into my workflow – in other words, I just couldn't get the hang of it). But the sensitivity settings are VERY easy to use and are very helpful.

Havit Gaming Mouse 12000 DPI Computer Ergonomic Wired Mice with 14 Programmable Buttons Interchangeable Side Plates (8 Buttons/ 8+6 Side Buttons), 2 Replaceable Right Plates for Laptop PC Gamer

Thursday, January 23, 2020

Poser Tip: How to make a MAT file

I'm prepping some freebie files for the class I'm working on (more on that very soon!), so I thought I would share this link with you on how to make material files for Poser.

http://www.cocs.com/poser/quickmatposes.htm

Just in case anything happens to the link, here's a quick summary of what it says:

Even though it may seem like making MAT poses is old hat to many people, here is a tutorial on how to make MAT poses, quickly and easily from an existing cr2 (figure file). How do we do it? Every cr2 file contains material information in it. So, we're going to remove the non-material information, change the file from a cr2 to a pz2 and, then, presto!, it's a MAT pose.

As a side note: using this method will result in creating MAT poses that are "optimized": they may start at the Runtime folder (or at the specific texture folder) and include a ":" in the references, as in "Runtime:Textures:vicky:body.jpg".
This is the generally-accepted, correct method for referencing texture files, rather than the incorrect method of starting at c:\Program Files and using backslash character, "\", as in "c:\Program Files\ e-frontier\ Poser\ Runtime\ Textures\ Vicky\ body.jpg" (Or, even worse, using a reference to a folder on a user's own D or E drive, as in "e:\graphics\ temp\ texs for models\ del later\ body.jpg".)

Sunday, November 24, 2019

Poser Superhero Freebie List

I'm working on another Superhero image and I was having trouble finding some of the items in my Runtime, so I went hunting for some new pieces. Since I'm working with Michael 4 as my base figure, I decided to go hunt down some Freebie Items.

And that's when i remembered this Fantastic List of FREE items:
https://www.daz3d.com/forums/discussion/9443/the-ultimate-super-hero-freebie-list/p1

Capes, Gloves, Boots, and whole costumes can be found there.

Sunday, July 7, 2019

Poser Tip: Updated Posette figure available

Posette is the low-res, old fashioned figure that originally shipped with Poser 4. She was the first figure to allow for interchangeable clothing. Needless to say, she is woefully outdated when compared to modern figures.

So, imagine my surprise when I found out that someone had taken the time to update her rigging and provide her with a new lease on life under the name: Nea 3.1 aeonia

https://www.renderosity.com/mod/freestuff/?item_id=78552&ca

Here's a list of the new features:

Nea’s features:
- Smoother look on head & body, new realistic eyes, lachrymals shaped on head and better shaped lashes
- Hundreds expression, head and body morphs
- Improved joint parameters and joint controlled correction bending morphs
- ERC controlled morphs for the hands/feet Scale
- Body Handles to control breasts individually
- New teeth body part
- Improved male full body morph and new male face shape
- Uses Victoria 1-2 and Judy (poser 5 woman) textures

Nea 3 includes various alternative geometry modes as switches on the Body:
- Posette skin
- Multi material Suit
- Animal feet & sock
- No thumb alternative hand geometry

I haven't tried this, yet, but I'm looking forward to testing it out.

Here's another link that may prove useful: Unzipping OBZ files: https://support.smithmicro.com/customer/en/portal/articles/1982171-poser-file-types?b_id=8847

Friday, June 21, 2019

Poser Tip: Bullet Physics and Cloth

Here is a GREAT video about using the Bullet Physics in Poser Pro.


It's about 20 minutes long and it is WELL worth watching all of it, as it shows how to set up a physics simulation. This has a lot of potential, especially because it has LIVE simulations.

Friday, May 24, 2019

Days Gone 21 - Current Project Update

The good news is that I have not been sitting on my butt since my last blog post about this project (wow – 9 months or so?). I've been working on pages, figured out a new system for doing the hero's hair, and have been making progress. I also took some breaks to work on other things, such as Princess of the Trees 2 and a book cover for The Epic Anthology of Galaxy Prime. I will write (and share pics) about both in the future.

I'll play catch-up later and reveal some shots of the comic in progress so far. Here's a look at what I'm working on right now (and how I fixed the problem).

In order to "rough up" the hero a little and give us some visual cues that he had been in a rough fight with the dragon, I decided to add some cuts to the character. A few on his arm and one on his face. Now, the cuts on his arm are pretty easy to place – and if they move a little bit between panels I'm okay with that, as it enhances the hand-drawn look I'm going for.

But the cut on the left side of his face... That's turned out to be problematic.

I'll see if I can find a shot of the original attempt, but the short of it is that I couldn't draw it consistently from panel to panel, especially when his face was moving around. After a few failed attempts (and some discussion with other artists during a DigitalArtLive.com workshop, I decided that I just needed to go back and edit the texture map for the face.

Now, as you may recall (that is if I wrote about it, I can't remember), I have stripped almost all of the texture maps off of my main characters. This gives me crisper shadows and gets rid of the speckling that can be caused by bump and displacement maps.

Here's an example of a figure that still has those maps, and you can clearly see the small dotted effects on his face. Now, there's nothing wrong with this effect at all. in fact, I might keep it for The Princess of the Trees 2 book. But for this one it is an effect I don't want.

Arton Character Design (not used)
© 2019 Mike Mitchell
I do keep textures on some of the props and scenery, but for the main figures in this story I only have textures applied to:

  • Hair
  • Face (for eyebrows that I hand drew)
  • Eyes
  • Eyelashes (texture makes them 100% transparent)

So, in regards to the cut on his face I went back to the face map and drew the cut on in Photoshop. It took a few tries to get it placed correctly, but I am ultimately satisfied with the results.

Here's a look at the face map. When in use it is 100% white with only a few black items drawn on it; in this image I'm letting some of the UV guides show through so you can get an idea of where everything is placed.

M4 Face Texture Map
(click to blow it up so you can see the eyebrow details)

So, now that you've seen the underlying mesh and my Photoshop edits, here's how the map looks when applied to the figure across two panels of the comic.

Days Gone, page 5, panels 1 & 2
© 2019 Mike Mitchell
As you can see, him turning his head doesn't affect the placement of the cut on his face. This serves as a perfect guide for any edits I need to make to it during the touch-up phase (in the second panel I shortened it just a little because it looked too close to his mouth).

In the future, I will definitely be relying more on edited texture maps and less on hand-drawn post work to resolve these issues. Which will give me more time to focus on things like why, in the second panel, are the straps so much smaller looking and why has the bottom strap ridden up so much?

Next Time: A long overdue update


Wednesday, January 9, 2019

Poser Resources: Victoria 4 Weight-Mapped

One of the coolest modifications to this level of 3D technology is the addition of Weight Mapping to figures. Here's the short version of what Weight Mapping is: It is a technology that helps create more realistic bends in 3D figures.

For example:

  • Hold your arm out and bend your elbow; you should see that bending your elbow adds a small flex to you bicep. 
  • This happens automatically because, in order to bend your elbow, the biceps muscles must contract and this makes them look bigger.
  • The same thing happens to your calf muscles when you bend your knee or foot. 
  • This happens to a lot of muscles and in a living creature it's automatic.
  • This is NOT automatic in 3D figures because they're not alive and they don't have muscles; they're just mathematics and geometry inside a computer. 

Most high-end 3D software (Maya, Lightwave, Z-Brush) has supported weight mapping for a while, and even some of the consumer-end stuff (Daz Studio & Poser) has had limited support for it in the newer figure ranges, particularly Daz3D's Genesis 3 & 8.

Unfortunately, Poser (which is the backbone of my 3D illustration process) does not easily support the Genesis figures. This means that, essentially, I'm "stuck" with using Victoria 4 and Michael 4 (and earlier) figures in my work.

Now, although Victoria 4 and Michael 4 are fantastic figures that are still full of life (especially for my comics work that doesn't require animation or 100% photo realism), they do feel a bit "long in the tooth" when it comes to things like weight mapping. Instead of having smart rigs that know how to flex muscles automatically when bending leg or arm, you have to do those modifications manually.

Fortunately, some really smart people created the scripts and info needed to apply weight mapping to Victoria 4 (hopefully Michael 4 will be soon behind, but I doubt it as the guys just don't get the love that the women do).

The V4 WM resources can be downloaded at this location:

http://www.morphography.uk.vu/~cagepage/poserplace/poserplace.html


Friday, December 14, 2018

Poser: A discussion to give me some ideas

I'm currently working on knocking out some comic pages for Days Gone, and I'm about to dive into my next project with some character designs for Princess of the Trees 2: Heart of the Forest. As such, I'm really struggling to get clothing to work with highly morphed/stylized figures.

Based on advice from the Daz3D forums, I'm checking out some discussions over at the Smith Micro Forums, and I'm finding some interesting discussions about the Fitting Room (a reasonably new feature in Poser) and doing some other rather extreme approaches like merging clothes and figure meshes.

The base discussion is here: https://forum.smithmicro.com/topic/2256/the-future-of-poser-is-the-fitting-room/78

Here are some tips from the article (copied in case the link goes dead):

There are Fitting Room Helpers for Dawn and Pauline (I believe they allow those figures to use V4 clothing):


  • https://www.renderosity.com/mod/bcs/dawn-fitroom-helpers/100163/
  • https://www.renderosity.com/mod/bcs/pauline-fitroom-kit/112531/


  • Mesh Combination Method (from sgbryan):


    • Definitely agree about the copy morphs from command. It is even more powerful after you use the Dials to Single Morph command.
    • That is how I put my characters together - Load base mesh (will ALL morphs); load character; fiddle about with dials; Dials to Single Morph; load clothing; Copy Morphs From; then either reduce the polys, or merge figure & clothing into 1 mesh; delete unused morphs; reload expressions.
    • End result - lightweight, clothed figure ready to go to work.
    • (someone else observed that sometimes this messes with hair, so perhaps it's best to add the hair after combining the clothes and base figure?)
    • (it looks like Dials to Single Morph is very important)

    Another possible tool (from morkonan)?

    • I suppose that would be nice. But, there are some third-party tools out there that are perfect for many things a vendor would want in regards to conversion capability. I like Autogroup Editor, helps immensely with grouping and preserves the UV (is somewhat difficult to fine tune individual polys in groups by hand,though), Quick Conform, for basic quick rigging transfers and editing out bones (tweaking necessary, though, using the Joint Editor), and Morcloth, for morph transfers. (Though, it takes a bit of fine-tuning, but it yields serviceable results that can be manually tweaked).
    • If SM could make the Fitting Room more powerful and could exceed the results already available using third-party apps, without significantly increasing their costs or ours, I'm all for adding super-powers to the Fitting Room! :)

    A note about copying morphs from figure to clothes (from viters):

    • My normal practice for "Copy Morphs from" is as follows:
    • Select the Morphs to copy to the clothing on the figure. We all know by now that this works but sometimes is pretty rough.
    • Then go to the clothing.
      • Click on the little arrow behind one of the morphs and select "Edit morph"=> This opens the morph brush.
      • Fine tune the morph to your liking.
      • Mostly that is some smoothing, or some "fitting" to get the correct "offset" between clothing and figure.
      • (Select by vertex group or by material zone, and you have even more control).
      • => Done.
    • Rarely this takes over a minute per morph, and I like the manual control to fine tune things.

    Tuesday, November 20, 2018

    Poser Tip: Copy Body Morphs to Clothing

    I'm working on a new character design and I'm having the usual problems getting the clothes to fit my figure's body. I knew there was a way to do it, so a quick search yielded this cool video.


    Short Summary:

    1. Load figure and clothing in Poser.
    2. Conform the clothing item to the figure ( Menu: Figure > Conform To... ).
    3. Select the clothing.
    4. Select Menu: Figure > Copy Morphs From...
    5. From the pop-up window, select only the morphs you need copied (you can usually ignore body parts you don't use, like head, hands, feet).
    6. The morphs associated with the body parts will then be available when working with the clothing.

    Friday, October 12, 2018

    Days Gone 20: Poser Tip – Cloth Room Settings

    I'm doing some experimentation with a dynamic version of the hero's chest harness, and in doing so I came across these useful settings for the Poser Cloth Room:


    I found this online at a discussion group. You can find it here:
    https://community.hivewire3d.com/threads/pulling-back-the-drapes-the-cloth-room.368/page-2

    My first attempt at using a dynamic harness.
    Not bad, but it looks too thin to be leather.
    Definitely needs some more work.

    For those of you unfamiliar with this feature, Poser has the ability to simulate dynamic cloth. That is, it creates an animation wherein the cloth folds and flows across the body in an attempt to create realistic folds and flow with the body. It's a neat feature (and there is now a plug-in for Daz Studio that does the same thing), but it's very tricky to get it looking just right.

    EDIT (05-20-2019): The Dynamic Harness was a dead-end. It just didn't lead anywhere useful. For the remainder of the project I will be using Prae's Epoch Top available from Renderosity.

    NEXT TIME: Current update