Wednesday, June 30, 2021

Using Poser to Make Comics: Create Custom Library Collections, pt 3

When I finished last week's tutorial, I didn't think there was a Part 3 to this series. But, as I thought about some of my other organizational techniques/practices, I realized that there is one other way I approach the Poser Library that might help give you guys some ideas.

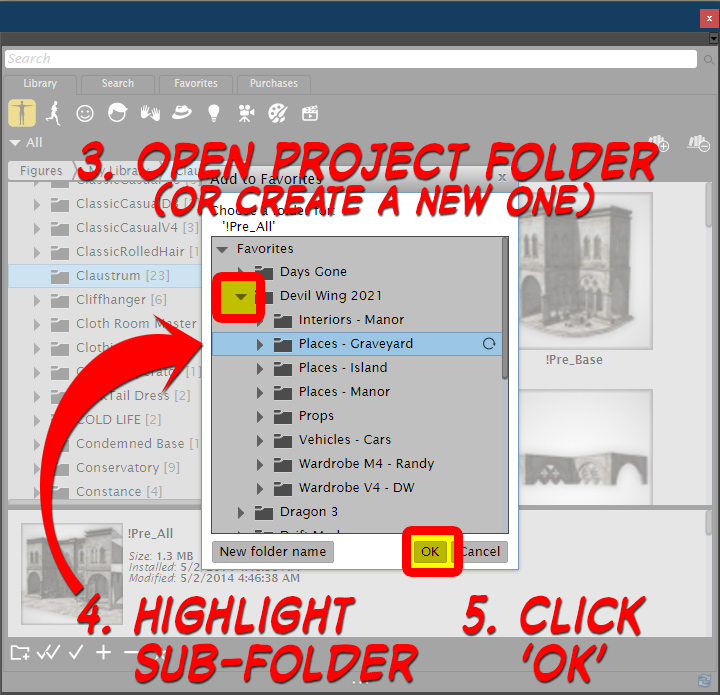
In addition to creating lists of Favorites, you can also create a custom Runtime Library with assets that will be used in your project. In other words, a Project-Specific Library. This could include customized figures (Michael 4 and Victoria 4 are my favorites), poses, buildings, landscapes, and vehicles. 

In addition to making it easy to find the items you're looking for, it also offers you the opportunity to easily make back-ups of all the assets that go into that project. For example, here's a screenshot of my current Runtime structure.

Project-specific libraries are highlighted.
Click image for a larger view.

When I create a Library for a single project, I duplicate a lot of things that are in other Runtimes. For example, the Gutshot Library (shown in the image above) is a collection of my Western assets. This definitely includes duplication with my Architecture Library, and with some stuff in My Library (which is the Daz Studio Library). I tend not to worry about duplicates in this situation because I follow one basic rule: If I start off by using an asset from a project-specific folder, I keep on doing it. In other words, I don't get the Hat out of the Gutshot folder and then get the matching bandana from the Poser 11 folder. That sort of crisscrossing can cause problems in the long run.

At any rate, like the Favorites, I only tend to use this approach when it's a Larger project with a lot of potential for confusion later down the road. With a big visual narrative project, keeping stuff where you can find it is a powerful tool/practice that can really pay off in the end.

Creating Custom Libraries

I'm not going to go through the whole step-by-step process on this process because there are already LOTS of great tutorials on this subject. Here's one that combines text and a great video:  

https://www.posersoftware.com/article/476/how-to-manage-your-poser-library


Wednesday, June 23, 2021

Using Poser to Make Comics: Create Custom Library Collections, pt 2

 Continuing our discussion from last time, we're going to dive into the nitty gritty of exactly how you customize the "Favorites" tab in the Poser Library, and we'll look at the ways I categorize my assets for a comic book story.


How to Save a Favorite Item to the Poser Library


  1. Browse through your Library until you find an item you like (note, it must be a single item, you cannot add a folder).
  2. Click on the "Favorite" icon (it's a star) at the bottom of the Library window.
  3. Open / Expand the Project Folder
  4. (If the folder doesn't exist, create it by clicking on the "New Folder Name" button).
  5. Highlight the sub-folder where you wish to place the item
  6. (NOTE: This is VERY important and easy to forget, so be careful).
  7. Click "OK" button.
  8. The item is now available in the "Favorites" tab in your Library.


One thing of note is that this actually creates a duplicate of the object – not a shortcut. So, if you are short on hard drive space, you might want to be judicious with your Favorites lists.


PRO TIP: If you ever need to reorganize your Favorites, you can right-click on an object and select the "Show in Explorer" option. Once there,  you can move files around. 

This is just one of the methods I've learned to use after significant trial and error, and I know it seems like a lot of work. Really, I get it. There are times when it feels like I'm spending more time "shopping" through my Runtime than I do making art. But, this process delivers numerous benefits, including:

  • Helping me see what I've already got, rather than rushing off to Renderosity or Daz to go buy something that I already have (like sunglasses... Randy needs a pair and I almost bought some, but looking carefully through my stuff, I found I already had a pair that were perfect for him).
  • When I post the image to Daz or Renderosity, this makes it a lot easier to track back to the item so I can list it in the promotional credits.
  • Also helps remind me that, when I do find a great asset, I should go write a review.

I know that a lot of you don't use Poser, so this article may be of limited value to you, but hopefully it will get you thinking about the logistics of creating a big, Visual Narrative projects. So, for you Daz users, the takeaway I want to leave you with is simply this: Using ANY sort of asset organization on a big project will be helpful in the long run.

Wednesday, June 16, 2021

Using Poser to Make Comics: Create Custom Library Collections, pt 1


Getting Started with a Visual Narrative Project


Using Poser to create a comic (or any project that requires a lot of images/renders) consumes a LOT of assets. There are figures, costumes, equipment, vehicles, weapons and numerous other items that will be needed. Like most of you (I imagine), I have MANY thousands of items at my disposal. Purchases, freebies, and who knows what are lurking in my Runtime and it's up to me to find out what's there so i can bring the story out of my head and out into the world.


One of the approaches I use is to think of it as a movie, mentally visualizing the places and people in my story, and then doing a deep search through my Poser Runtime to find the various bits and pieces I might need or want. And this includes selecting different options, especially for clothing. If I were working on a movie, these tasks would be handled by different professionals:

  • For example, some standard movie roles include:
  • Set Designer / Set Construction (interiors)
  • Location Supervisor (exteriors)
  • Wardrobe (clothes, sunglasses, wristwatch)
  • Prop Master (guns, crucifixes, wooden stakes, possibly cars)
  • Hair & Makeup specialists
I'm not even including all the lighting and other stuff, such as "casting" because we kind of create our characters, rather than find them (at least partly – I frequently do look for pre-existing characters in my library and use them if they look right for the part; this is especially true for minor/background characters).

So, back to the tip I'm trying to summarize.

Poser has a great feature in the Library called FAVORITES, which is a fantastic way to organize assets. For a new project, I will open the Library and, on the Favorites tab, I will create a Project Folder (in this case, "Devil Wing 2021"). Then, I will go through my Runtime and look for the various items I will need and save the various items to separate, organized folders. As you can see in the attached screenshots, the folder names are pretty specific to what's in them.

In this case, that includes places/locations (the two big scenes take place in a mansion and in a graveyard, but I will also need some other assets, like a cityscape (she flies over it on her way to the graveyard) and a Greek island (flashback) and I'll also need trees and shrubs to flesh out those locations), interior (mansion interior includes long hallway, library, occult "study" room, & some other room yet to be determined). I'm not sure I'll need a vehicle this time, but I might in the future, so I tagged a few that I like. And, of course, I need to dress the characters (wardrobe) – for them, I will have different folders for each character, and possibly for different scenes (for instance, fancy dress versus casual).

SIDE NOTE: If the project goes beyond this initial two-issue short story, I would create a more detailed "Call List / Catalog" in Excel or Word (or the Google Docs equivalents) to better organize things and make it easier for me to sort out the various references and image credits.

NEXT TIME: Step-by-step instructions on how to create custom collections in your Poser Library.

Wednesday, June 9, 2021

Gaming Mouse is VERY Useful in 3D

 Last year I wrote a quick review about my recent purchase of a gaming mouse to assist with my work: http://mikemitchellonline.blogspot.com/2020/08/tip-use-gaming-mouse-with-poser-and-daz.html

I was pretty new to the whole thing back then, but a year or so later and I must amend my report to say that this mouse is a fantastic addition to my toolkit. I'm extremely happy with it and now really can't see how I got along without it.

I never did get the hang of those marco buttons on the side, so I removed them. What turns out to be invaluable is the ability to change resolution (i.e. sensitivity) at the touch of a button. The allows me to make very fine adjustments to the dials in Poser.

The mouse has these possible settings:

More Hand Movement << 1200-2400-4800-6200-8000-12000 DPI  >> Less Hand Movement


I usually keep it on 4800, which has a nice feel and speed to it. But, when I need to move the dials to make minute light adjustments in Poser, I just press the button on top of the mouse and suddenly it takes a lot more motion to move things, which means I have a lot more control of the final outcome.


Wednesday, June 2, 2021

Cerebus Attacks

 Cerebus the Aardvark is one of the most successfully published indy comic characters of all time. Artist Dave Sim, running 300 issues published from 1977 thru 2004. After the series veered off into politics, it faded away from my interest, to be honest. But the early issues are still brilliant and I still learn a lot from the artwork and storytelling (seriously, even though you probably cannot see it in my work, Sim's approach to lighting and backgrounds are a strong influence on how I approach comics art).

Anyway, I found a 3D figure of the Aardvark over at ShareCG, so I downloaded it and was pleasantly surprised to find that it's pretty good. It also "kind of" accepts poses for Michael 4. So, here is just a quickie illustration I did to play around with the figure and some free brushes I got from Clip Studio's website.

Typical workflow applies: Poser Pro 11 and Clip Studio Paint.

© 2021 Aardvark-Vanaheim